Transforming a tiny courtyard isn’t about small furniture; it’s about mastering sensory illusions to trick the brain into perceiving more space.
- Strategic sound masking and light-bouncing paint are more effective at creating a sanctuary than just adding more plants.
- Large pavers and minimal, high-impact decor reduce cognitive load and visually expand the space.
Recommendation: Focus on solving one sensory problem at a time—sound, sight, or light—for the biggest and most immediate impact.
The promise of an urban courtyard is a private slice of the outdoors, a personal retreat from the city’s relentless hum. Yet, the reality for many is a cramped, 200-square-foot concrete box, overlooked by neighbors and echoing with traffic. The conventional wisdom is to fill it with small-scale furniture and a profusion of vertical planters. But these solutions often fail to address the core issues: the feeling of being confined and the constant sensory overload.
What if the key wasn’t just about what you put in the space, but how you manipulate the perception of it? Think of yourself not as a decorator, but as a spatial illusionist. The true art of designing a compact courtyard lies in perceptual hacking—skilfully managing sound, light, sightlines, and visual complexity to convince the mind that the space is larger, quieter, and more private than it really is. It’s about creating an experience, not just a view.
This guide moves beyond generic tips to explore the psycho-perceptual principles that turn a tiny backyard into a genuine oasis. We will deconstruct the sensory challenges of urban living and provide actionable strategies to reclaim your peace and privacy, transforming your small patch of concrete into a sanctuary that feels expansive and serene.
For those who prefer a visual format, the following video offers a wealth of inspiration, showcasing a variety of stunning courtyard designs that perfectly complement the strategic principles discussed in this guide.
To help you navigate these transformative strategies, we’ve broken down the key elements of courtyard design. This structured approach will guide you through mastering each sensory aspect, from sound and light to texture and privacy, to build your urban oasis layer by layer.
Contents: Unlocking the Secrets of a Compact Urban Oasis
- How to Use White Noise to Drown Out City Traffic?
- Climbing Hydrangea vs Ivy: Which Wall Cover Won’t Damage Brick?
- Painting Garden Walls White: Brilliant Idea or Glare Nightmare?
- Fold-Down Tables: Custom Solutions for Narrow Side Returns
- Why Large Pavers Make a Small Courtyard Look Bigger?
- Why Excessive Ornamentation Increases Cognitive Load in Small Homes?
- How to Block the Neighbor’s View Without Building a Fortress?
- Solar-Powered LED Path Lights: Which Models Actually Last Through Winter?
How to Use White Noise to Drown Out City Traffic?
The most immediate assault on a city dweller’s peace is noise. Before you can feel relaxed, you must first address the intrusive sounds of traffic, sirens, and neighbors. The solution isn’t to build a soundproof bunker but to create an “acoustic shield” with pleasant, consistent white noise. A well-chosen water feature is the ultimate tool for this, masking harsh, intermittent sounds with a soothing, constant burble or splash.
The effectiveness of this technique is measurable; studies show that a properly designed water feature can achieve a 5-8 dB reduction in perceived ambient noise. This is the difference between a jarring disturbance and a background hum. The key is to select a fountain with a sound profile that directly counters your specific noise problem. Louder, more energetic splashes are needed to mask the roar of rush hour, while a gentle trickle suffices for quieter evenings. It’s about layering sound strategically.
To maximize the effect, consider these sound-masking strategies:
- Install fountains with adjustable flow rates. This allows you to create loud splashes during peak noise times and dial down to subtle levels when the city quiets down.
- Combine water features with sound-absorbing surfaces. Clinging vines like Boston Ivy or even a small patch of dense lawn have a surprising ability to refract and absorb sound waves.
- Position water elements strategically. Place your fountain where sound tends to bounce off hard walls to maximize the masking effect throughout the entire courtyard.
By creating your own soundscape, you take control back from the city. You’re not eliminating the noise; you’re replacing it with a sound of your own choosing, a fundamental step in crafting a true sanctuary.
Climbing Hydrangea vs Ivy: Which Wall Cover Won’t Damage Brick?
Bare brick or concrete walls can make a small courtyard feel like a prison yard. Softening these vertical surfaces with climbing plants is a classic solution, but it comes with a legitimate fear: will the plants destroy the mortar and devalue the property? The answer depends entirely on choosing the right plant with the right climbing mechanism. The distinction between plants that cling with adhesive pads versus those that use penetrating aerial roots is critical.
English Ivy (Hedera helix) is the main culprit, using aggressive aerial roots that can work their way into old or weakened lime mortar. However, plants like Boston Ivy (Parthenocissus tricuspidata) use gentle adhesive pads that stick to the surface without penetration. In fact, they can even offer protection. A fascinating homeowner account details how a 70-year-old house’s ivy-covered walls required no maintenance for 24 years, while the uncovered sides needed repainting twice, proving that the right vine acts as a protective shield against weathering.

This visual distinction is key to making an informed choice. Climbing Hydrangea falls somewhere in the middle, using aerial roots that are far less aggressive than English Ivy’s, typically leaving only a sticky residue. For most modern homes with sound mortar, the risk from any of these plants is low, but for older properties, the choice is clear.
This table, based on an in-depth analysis of climbing plants, breaks down the risks and benefits to help you make a safe and beautiful choice.
| Plant Type | Climbing Method | Risk to Pre-1930 Homes | Risk to Modern Brick | Maintenance Required |
|---|---|---|---|---|
| English Ivy | Aerial roots | High – penetrates lime mortar | Low if mortar is sound | Aggressive pruning needed |
| Climbing Hydrangea | Aerial roots | Moderate | Low – sticky residue only | Manageable trimming |
| Boston Ivy | Adhesive pads | Low – surface attachment only | Very Low | Occasional edge trimming |
Painting Garden Walls White: Brilliant Idea or Glare Nightmare?
Painting a courtyard’s boundary walls white seems like an obvious way to make the space feel bigger and brighter. It’s a technique used universally to evoke a breezy, Mediterranean feel. However, in a sun-drenched, south-facing courtyard, a brilliant white wall can become a source of blinding glare, turning your intended oasis into an uncomfortable, overexposed space. The solution isn’t to abandon the idea, but to apply it with a painter’s strategic eye.
As garden designer Jennie Dunlop points out, the goal is to create an airy atmosphere by bouncing light. The key is controlling *where* and *how* that light is bounced.
Creating a sense of openness is key in small courtyards. Light coloured materials with use of reflective materials can create an illusion of a larger space, bouncing light around your courtyard and evoking a breezy, airy and intimate atmosphere.
– Jennie Dunlop, Dunlop Design
Instead of a uniform coat of white, think in zones. A brilliant white should be reserved for the shadiest wall, where it can capture and reflect precious light into dark corners. For walls that receive direct sun, opt for softer, less reflective tones like soft grey, stone, or sage green. These hues absorb some of the intense light, reducing glare while still keeping the space feeling open. Another expert technique is to use a textured finish like limewash, which diffuses light beautifully rather than reflecting it harshly.
Your Action Plan: Strategic Wall Painting for Light Control
- Assess Light Patterns: Identify which walls are in shade most of the day and which receive direct, intense sun.
- Zone Your Colors: Paint only the shadiest wall a brilliant white to maximize brightness without creating glare.
- Soften Sunny Walls: Use soft grey, stone, or sage green on sun-facing walls to keep the space light but comfortable.
- Consider Texture: Apply textured finishes like limewash or gritty masonry paint to diffuse sunlight beautifully and add depth.
- Create Depth with Tones: Consider painting different walls in varying tones of the same color to create visual interest and a greater sense of dimension.
Fold-Down Tables: Custom Solutions for Narrow Side Returns
A narrow side return—that awkward, alley-like space common in urban homes—is often the most challenging part of a small courtyard. It’s too narrow for conventional furniture, quickly becoming a dead zone used for storing bins and forgotten garden tools. The key to reclaiming this valuable real estate is to think kinetically, embracing furniture that appears only when needed and vanishes when it’s not.
Fold-down tables and benches are the ultimate solution. Mounted directly to the wall, they consume zero floor space when not in use, preserving the critical thoroughfare. When folded down, they instantly transform the narrow passage into a functional area for morning coffee, an evening drink, or a laptop-friendly workspace. This isn’t just about saving space; it’s about adding functionality that was previously impossible. A well-executed project in San Francisco demonstrated that smart, built-in solutions can lead to an 18% increase in usable outdoor area—a massive gain in a compact footprint.
While off-the-shelf options exist, a custom solution is often superior. A bespoke fold-down table can be built to the exact dimensions of your side return, maximizing every inch. You can choose materials that match your home’s exterior, integrating the feature seamlessly. Consider using durable hardwoods like teak or iroko for a warm, natural look, or marine-grade plywood painted to match your walls for a minimalist, disappearing effect. The support mechanism is equally important; robust, high-quality brackets are essential for safety and longevity. This approach turns a design constraint into a unique, high-impact feature.
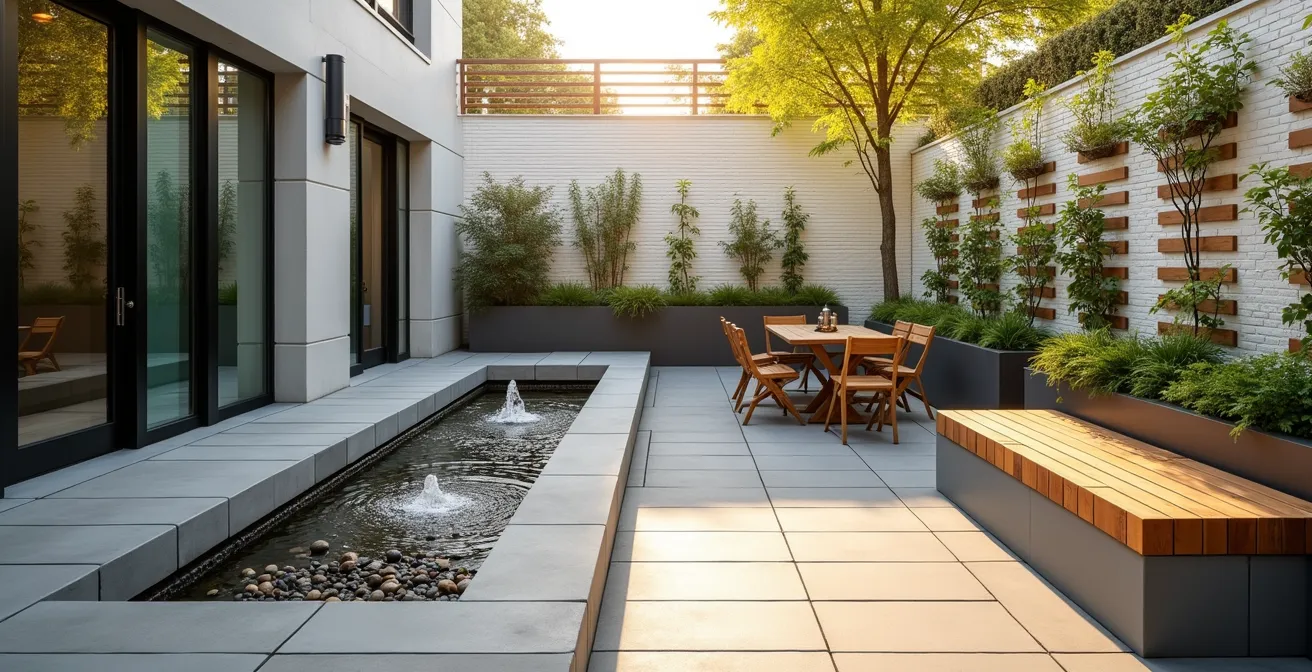
Why Large Pavers Make a Small Courtyard Look Bigger?
It’s a counter-intuitive principle of design: to make a small space look bigger, use large elements. When it comes to flooring, laying down a sea of small, busy pavers or tiles creates a grid of grout lines that chops up the space visually. The brain registers all these lines and interprets the area as cluttered and small. Conversely, using large-format pavers (e.g., 24×24 inches or larger) dramatically reduces the number of visual interruptions.
With fewer grout lines, the floor becomes a more unified, continuous surface. This visual simplicity tricks the eye into perceiving the courtyard as a single, expansive plane rather than a collection of tiny squares. The effect is an immediate sense of spaciousness and calm. The material and color of the pavers also play a role. Light-colored stone or concrete will reflect more light, further enhancing the feeling of openness, connecting back to the principles of light manipulation.
The pattern in which you lay these large pavers offers another opportunity for perceptual hacking. A standard grid pattern is clean and simple, but laying the pavers on a 45-degree diagonal can be even more effective. The diagonal lines create a forced perspective, drawing the eye along the longest possible axis of the courtyard and making it feel deeper and wider than it actually is. This is a classic illusionist’s trick, using geometric lines to direct perception.

This overhead view demonstrates how the strong diagonal lines lead the eye, creating a dynamic sense of movement and expansion within the confined walls. The minimalist approach, with clearly defined zones and uncluttered surfaces, reinforces the feeling of an organized, harmonious, and larger space.
Why Excessive Ornamentation Increases Cognitive Load in Small Homes?
In the quest to personalize a small courtyard, it’s easy to fall into the trap of over-decorating. A collection of small pots, multiple garden gnomes, a string of fairy lights, and a handful of decorative lanterns might seem charming in isolation, but together they create visual chaos. This isn’t just a matter of taste; it’s about psychology. Every object in our field of vision demands a small amount of mental processing power. In a confined space, an abundance of small, unrelated items creates a high cognitive load, making the brain work overtime and inducing a subtle feeling of stress and clutter.
To create a truly serene oasis, you must be ruthless in your editing. The goal is to reduce cognitive load by embracing the “One Signature Piece” rule. Instead of ten small, forgettable items, choose one single, high-impact focal point. This could be a sculptural Japanese Maple in a large, elegant planter, a unique wall-mounted water feature, or a single piece of outdoor art. This one beautiful object gives the eye a clear place to rest, creating a sense of order and intention.
This principle of “functional beauty” should extend to all elements. Here’s how to apply it:
- Replace decorative clutter with functional beauty. Instead of small solar stakes, invest in architectural path lights that are both beautiful and useful. Swap a cheap plastic hose reel for a sculptural, modern hose pot.
- Unify your materials. If you have multiple planters, top-dress them all with the same material, like dark slate chippings or light river pebbles, to create visual cohesion.
- Invest in integrated storage. The greatest source of cognitive load is often the clutter of maintenance: tools, hoses, and bags of soil. A built-in bench with hidden storage keeps these items out of sight, instantly calming the space.
By curating your courtyard with the discipline of a museum curator, you allow each piece to have an impact. This minimalist approach reduces mental noise and is the secret to making a small space feel not just bigger, but profoundly more peaceful.
How to Block the Neighbor’s View Without Building a Fortress?
Privacy is not a luxury; it’s a prerequisite for relaxation. The feeling of being watched from a neighboring window instantly shatters the illusion of a private sanctuary. The common reaction is to erect a tall, solid fence or wall, but this often exacerbates the problem, making the courtyard feel even more like a confined box and potentially creating a dark, shaded environment. The sophisticated solution is not to block, but to filter and obscure with layered, “soft” screening.
As landscape designer Marcus Barnett notes, a comfortable space is the perfect antidote to a busy week. Creating that comfort means managing sightlines without sacrificing light and air. Layered screening achieves this by creating a sense of enclosure without total isolation. It involves using a combination of elements at different depths to break up the line of sight. Think of it as creating a visual veil rather than a solid wall.
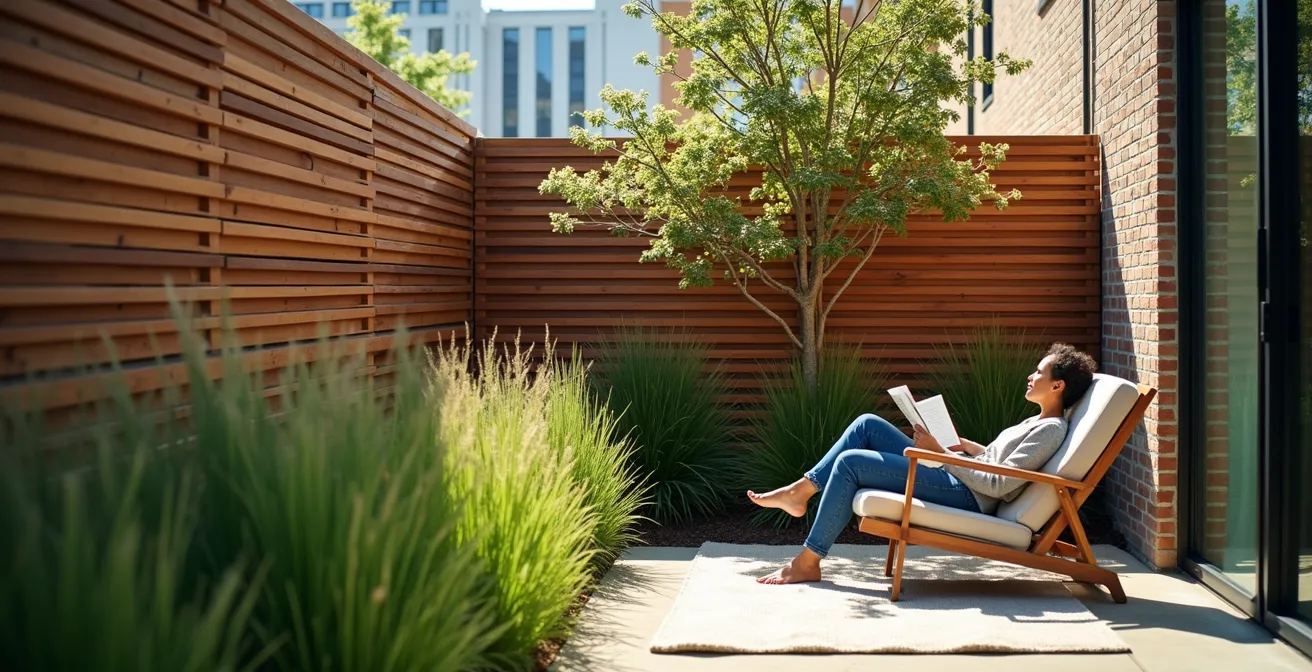
The key is to use a mix of materials. A frosted glass or slatted wood panel might provide the primary screen, but placing a cluster of tall, slender bamboo or a graceful ornamental grass in front of it adds depth and a natural, moving element. For a view from a second-story window, a strategically placed small tree like a multi-stem Amelanchier or a retractable shade sail can block the specific sightline without casting the entire courtyard in shadow.
This table, drawing from expert advice on urban privacy solutions, offers tailored strategies for different challenges.
| Privacy Challenge | Solution | Visual Impact | Maintenance Level |
|---|---|---|---|
| Eye-level viewing | Tall grasses (Calamagrostis) | Natural, soft movement | Low – annual cutting |
| Second story overlook | Retractable shade sails | Modern, adjustable | Medium – seasonal setup |
| Direct window view | Columnar trees | Elegant, permanent | Low – occasional pruning |
| Full perimeter | Layered screening panels | Contemporary, filtered light | Very low |
Key Takeaways
- The perception of space is more important than actual square footage; use sensory hacks to create an illusion of size and calm.
- Solve one sensory problem at a time: start with masking unwanted noise, then manage light and glare, and finally obscure sightlines.
- Embrace minimalism by choosing one high-impact focal point over multiple small decorations to reduce cognitive load and create a serene atmosphere.
Solar-Powered LED Path Lights: Which Models Actually Last Through Winter?
A well-lit courtyard doubles its usability, transforming from a dark void into a magical evening retreat. Solar-powered LED lights offer a wire-free, eco-friendly solution, but many homeowners have been disappointed by cheap models that dim by midnight or fail entirely during the short, overcast days of winter. The key to year-round performance lies not in the price tag, but in scrutinizing the technical specifications for winter-readiness.
The heart of a solar light’s performance is its ability to charge efficiently in low light and store that energy effectively. This comes down to two components: the solar panel and the battery. Most cheap lights use polycrystalline panels, which are inefficient in cloudy weather. For winter survival, you must look for models with monocrystalline solar panels, which have a much higher efficiency rate in low-light conditions. Similarly, battery capacity is crucial. A light with a small battery will never last through a long winter night. Look for a capacity of at least 2000mAh as a baseline for reliable winter performance.
Durability against the elements is the final piece of the puzzle. Any outdoor electronic device must be able to withstand rain, snow, and frost. This is measured by its Ingress Protection (IP) rating. An IP65 rating is the minimum you should accept; it ensures the light is dust-tight and protected against water jets from any direction, making it suitable for year-round exposure. By focusing on these core specifications, you can find reliable solar lights that won’t leave you in the dark.
- Panel Type: Insist on monocrystalline panels for superior low-light charging.
- Battery Capacity: Seek a minimum of 2000mAh for all-night power in winter.
- Waterproof Rating: A rating of IP65 or higher is essential for durability.
- Panel Size & Angle: Choose models with larger, well-angled panels to maximize exposure to the low winter sun.
- Strategic Use: Consider solar spotlights for uplighting trees or textured walls to create dramatic vertical interest at night.
By systematically applying these principles of sensory manipulation—from crafting an acoustic shield to painting with light and reducing cognitive load—you can fundamentally rewrite the story of your small urban courtyard. You move from being a resident of a cramped space to the creator of an expansive, personal sanctuary. The final step is to apply this knowledge with intention, turning your 200 square feet into a limitless escape.