Contrary to popular belief, placing a mirror directly opposite a window is often the wrong move for brightening a room.
- True brightness comes from understanding how light reflects at different angles and how materials like brass or chrome interact with light’s specific temperature.
- The reflective power of paint (LRV) and its finish—matte for diffusion, high-gloss for targeted highlights—is a more critical factor than color alone.
Recommendation: Map your room’s daily light path to place reflective accents where they will capture and multiply natural sunlight most effectively.
That persistent, gloomy corner in your living room isn’t just a design problem; it’s a drain on your energy and mood, especially during the darker months. Many of us instinctively reach for the usual solutions: a floor lamp, a lighter shade of paint, or the classic advice to hang a large mirror. While these can help, they often fail to address the root of the issue, leaving the space feeling just as flat and uninspired as before.
The common approach treats light as a brute-force addition. We try to flood a space with more light, whether artificial or reflected. But what if the real secret isn’t about adding more, but about intelligently managing the light you already have? The most sustainable and effective strategy lies in creating a passive lighting system—a network of surfaces designed to catch, amplify, and guide natural light into the farthest reaches of a room. This requires moving beyond simple decoration and into the realm of light science.
This is where the resourceful designer’s mindset comes in. It’s about understanding the physics of reflection, the psychology of color temperature, and the specific properties of materials. Instead of just placing a metallic vase on a shelf, we’ll ask: should it be brass or chrome? Should it be positioned to catch the cool morning light or the warm afternoon sun? This article will guide you through this strategic process, transforming your home into a brighter, more uplifting environment without ever touching a light switch.
This guide will explore the science behind reflective decor, from the biological impact of darkness to the practical physics of light bounce. You will learn how to choose the right materials, apply paint finishes with intention, and place accents with scientific precision to create a home that feels naturally bright and alive.
Summary: A Strategic Guide to Illuminating Your Home Naturally
- Why Dark Corners Induce Lethargy and Low Mood in Winter?
- How to Choose Between Chrome, Brass, and Glass for Maximum Light Bounce?
- High-Gloss Paint vs Matte: Which Finish Actually Saves on Lighting Bills?
- The ‘Disco Effect’ Error: When Reflective Decor Becomes Distracting
- Where to Place Metallic Accents to Catch the Golden Hour Sun?
- Why Placing a Mirror Opposite a Window Doesn’t Always Work?
- Why Lighting Candles Changes the Thermal Perception of a Room?
- How to Position Pendant Lighting Over a Dining Table for Perfect Ambiance?
Why Dark Corners Induce Lethargy and Low Mood in Winter?
The feeling of sluggishness in a dimly lit room is more than just a perception; it’s a biological response. Our bodies are intrinsically linked to light cycles. When we spend time in dark environments, especially during winter’s shorter days, our brains increase the production of melatonin, the hormone that regulates sleep. According to research highlighted by Mental Health America, this hormonal shift can disrupt our natural circadian rhythms, leading to daytime drowsiness, low energy, and even symptoms associated with Seasonal Affective Disorder (SAD).
This is not just about feeling sleepy. Prolonged exposure to darkness can have a more profound impact on brain chemistry. Studies have explored the effects of light deprivation on neurotransmitters essential for mood and cognition. For instance, early research has shown that environments lacking sufficient light can impact the brain’s ability to produce serotonin and dopamine. These are the “feel-good” chemicals responsible for feelings of happiness, motivation, and well-being. A deficit can lead to a state of lethargy and a generally low mood.
Therefore, brightening a dark corner is not merely an aesthetic choice—it’s an act of environmental self-care. By strategically introducing reflective surfaces, you are not just decorating; you are actively creating an environment that supports your body’s natural chemistry. You are fighting back against the biological triggers for winter blues, promoting alertness and a more positive mental state simply by manipulating the natural light that enters your home. The goal is to create a space that feels energetically bright, not just visually bright.
How to Choose Between Chrome, Brass, and Glass for Maximum Light Bounce?
Not all reflective surfaces are created equal. The material you choose has a dramatic effect on the quality and “temperature” of the light it reflects. Think of it like choosing a filter for a camera lens; each material colors the light in a specific way. The key is to match the material to the type of light you have and the mood you want to create. Cool, north-facing light benefits from the warmth of brass, while warm, south-facing light can be balanced by the crisp reflection of chrome.
The following table, based on common design principles for manipulating light, breaks down how different materials interact with light. Understanding this allows you to build a sophisticated “passive lighting system” instead of just adding shiny objects randomly.
| Material | Light Temperature | Best Room Orientation | Reflection Type |
|---|---|---|---|
| Chrome/Nickel | Cool (Higher Kelvin) | North-facing rooms | Specular (mirror-like) |
| Brass/Copper | Warm (Lower Kelvin) | South-facing rooms | Warm glow enhancement |
| Clear Glass with Water | Dynamic/Variable | Any orientation | Refractive scattering |
| Beveled Glass/Crystal | Rainbow spectrum | Direct sunlight areas | Prismatic splitting |
Beyond simple reflection, some materials can split and scatter light in beautiful ways. Crystal and beveled glass are masters of this, performing an act of prismatic splitting. They take a single beam of sunlight and refract it, casting a spectrum of colored light—a mini-rainbow—into your room. This adds a dynamic, almost magical quality that a flat mirror cannot replicate.
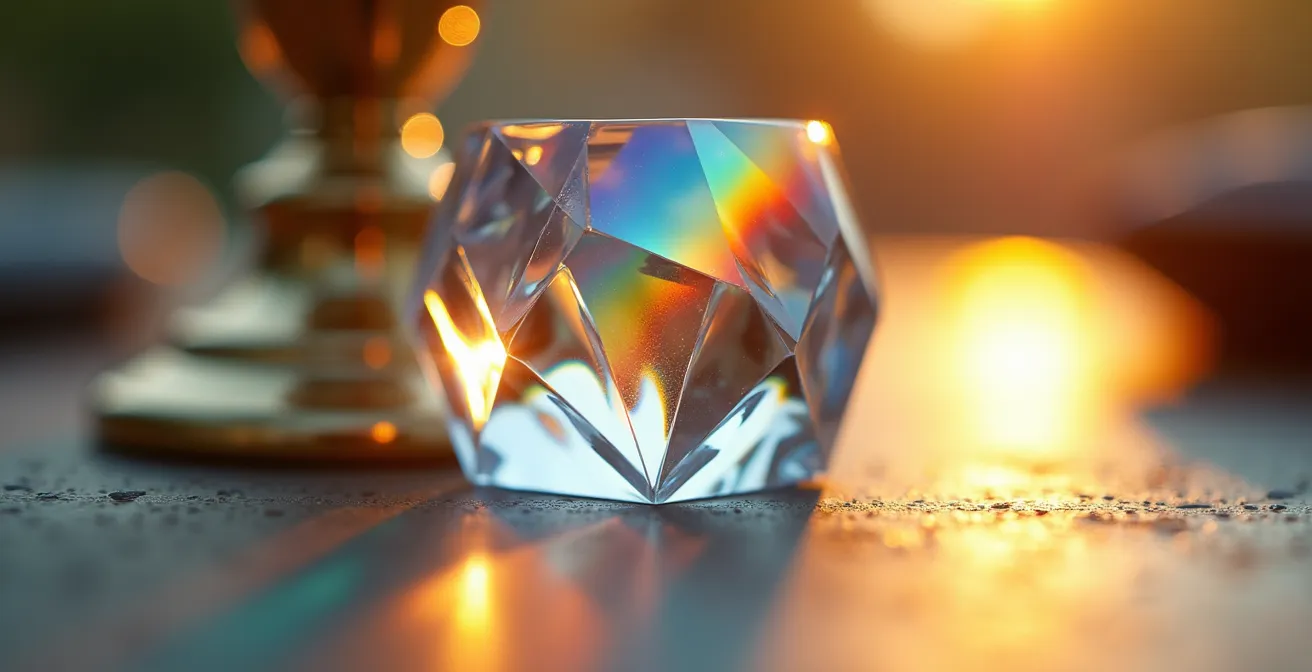
Using this knowledge, you can “paint” with light. Place a brass tray where it will catch the afternoon sun to cast a warm, golden glow into a dark corner. Position a crystal paperweight on a windowsill to send dancing rainbows across the ceiling. This isn’t just decoration; it’s a calculated and creative manipulation of physics to enhance your living space.
High-Gloss Paint vs Matte: Which Finish Actually Saves on Lighting Bills?
The single largest surface in any room is its walls, making paint your most powerful tool for passive lighting. However, color is only half the story. The finish of the paint determines *how* it reflects light. This is measured by a metric called Light Reflectance Value (LRV), which indicates the percentage of light a paint color reflects. A higher LRV means a brighter room. According to architectural guidelines from paint manufacturers like Diamond Vogel, colors with an LRV above 60 are considered effective for brightening, and those above 75 are excellent.
This is where the finish comes into play. A matte or eggshell finish creates diffuse reflection. It scatters light gently and evenly in all directions, which is ideal for raising the overall ambient brightness of a room without creating harsh hotspots. This is your workhorse for the main walls, especially when using a high-LRV color.
A high-gloss finish, on the other hand, creates specular reflection—a mirror-like, direct bounce. Using it on all four walls would be a mistake, creating a distracting, funhouse effect. However, when used strategically, it becomes a powerful tool. Applying a high-gloss finish to trim, doors, or even the ceiling can create defined “light paths” that bounce direct sunlight deeper into a space. It acts like a spotlight, targeting specific areas with a concentrated beam of reflected light. The contrast between diffuse matte walls and specular gloss trim creates a layered, sophisticated brightness.
Your Action Plan: Strategic Paint Selection for Light Distribution
- Check the LRV number on paint chips (often on the back of the sample); aim for a value of 60+ for walls in dark rooms.
- Apply a high-LRV matte or eggshell finish (in the 60-75 LRV range) on your main walls to ensure even, diffuse light distribution.
- Use a high-gloss finish selectively on architectural details like trim, doors, or a single feature wall to create targeted light paths.
- Look beyond stark white; pale pastels with a high LRV can often feel brighter and less clinical.
- Always test paint samples on your walls, observing them at different times of day to see how the LRV performs with your room’s specific natural and artificial light.
The ‘Disco Effect’ Error: When Reflective Decor Becomes Distracting
In the quest for brightness, it’s easy to go too far. Loading a room with too many highly reflective surfaces—mirrors, polished chrome, high-gloss furniture—can backfire, creating a visually chaotic and uncomfortable environment. This is the “Disco Effect”: a space filled with moving hotspots, distracting glints, and blinding glare. Instead of serene brightness, you get visual noise. The goal is to achieve a soft, ambient lift in light, not to turn your living room into a dance club.
The problem arises from an over-reliance on specular (mirror-like) reflection without balancing it with diffuse (scattered) reflection. A room needs a mix of textures and finishes to manage light effectively. Matte walls, woven textiles, and natural wood absorb and soften light, providing a necessary counterpoint to the sharp reflections of metal and glass. As one interior design expert aptly puts it, the goal is to create a balanced “soundstage” of light, not to have a single “instrument” playing too loud.
You want a balanced ‘soundstage’ of light, not a single ‘instrument’ playing too loud.
– Interior Design Expert, Professional Mirror Placement Guidelines
Avoiding the Disco Effect is a matter of strategic placement and layering. A mirror should be hung to reflect something beautiful or to bounce light into a dark corner, not where it will catch your eye from your favorite armchair or reflect the television screen. A group of metallic accents should be clustered to create a single, intentional focal point, not scattered randomly where they create competing glints. Think about primary and secondary reflections: the first bounce from a mirror is powerful, but directing that bounce onto a light-colored matte wall (a secondary reflection) diffuses the light and spreads it more gently through the space.
Where to Place Metallic Accents to Catch the Golden Hour Sun?
The most magical light of the day is the “golden hour”—the first hour after sunrise and the last hour before sunset. During this time, the sun is low in the sky, casting long shadows and bathing everything in a warm, golden hue. As a resourceful designer, your job is to anticipate and capture this fleeting moment. This requires a process of light path mapping, which is far more intentional than simply placing an object on a shelf.
Spend a day observing your room. Take note of where the direct sunlight falls at different times. A crucial scientific study published in Scientific American explored the neurological impact of light, reinforcing how crucial these daily patterns are for our well-being. Identify the “hotspots” where the low-angled morning and evening sun land. These are the prime locations for your metallic and glass accents. In winter, the sun’s path is lower, so place accents on console tables or low shelves. In summer, the path is higher, making wall-mounted pieces or high shelves more effective.
Once you’ve identified a hotspot, create a “sun-catcher vignette.” This is a curated grouping of objects designed to work together. For example, combine a brass tray (for a wide, warm glow), a small, beveled mirror (for a sharp, directed reflection), and a colored glass object (for a touch of translucent color). When the golden hour sun hits this vignette, it will come alive, casting a complex and beautiful array of warm light patterns deep into the room.

This is a proactive approach. You are not just decorating a surface; you are setting a stage for a daily light show. You are using your decor as a tool to harvest the most beautiful natural light of the day and use it to animate the darkest parts of your home, creating a space that changes and evolves with the sun.
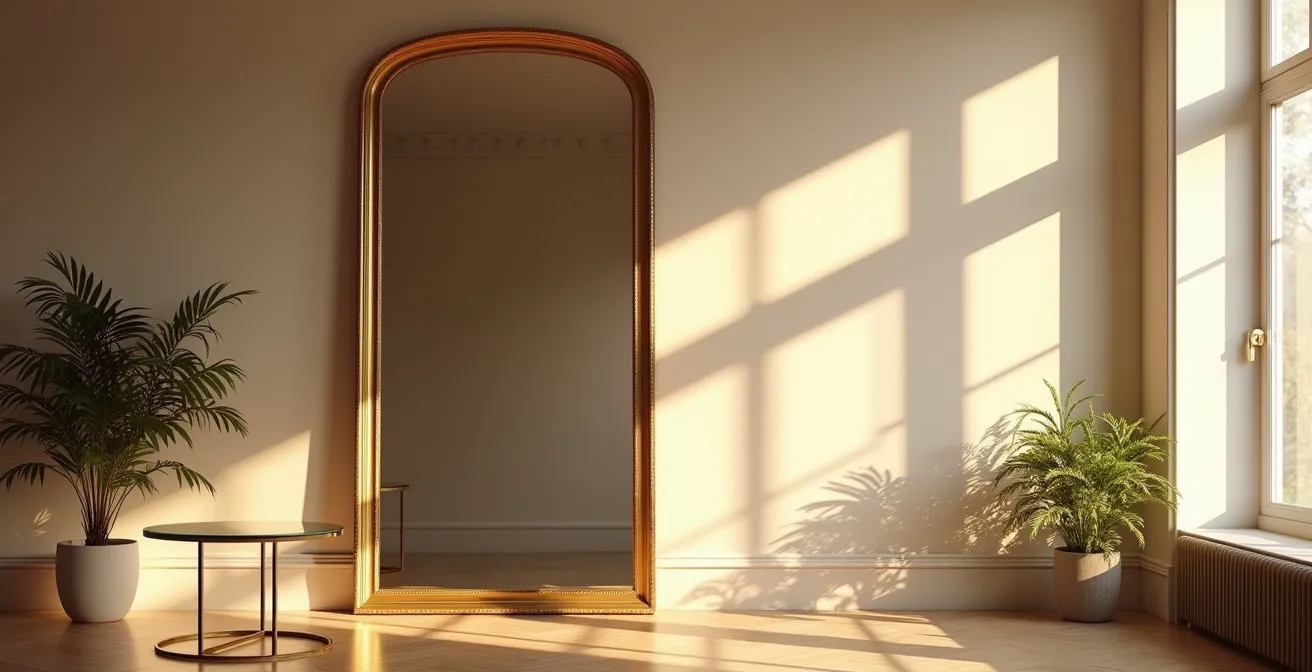
Why Placing a Mirror Opposite a Window Doesn’t Always Work?
It’s one of the oldest rules in the decorating handbook: “To brighten a room, place a mirror opposite a window.” While logical in theory, this advice is often flawed in practice. It fails to account for the angle of reflection and the quality of the view being multiplied. Simply placing a mirror in direct opposition to a light source can result in overwhelming glare rather than useful, distributed illumination.
The issue lies in a basic principle of physics: the angle of incidence equals the angle of reflection. When a mirror is directly opposite a window, it bounces the light straight back towards the window and the area immediately around it. This can create a blinding hotspot for anyone sitting near the window, without effectively “throwing” the light deeper into the room where it’s needed most.
Case Study: The Perpendicular Placement Principle
Experienced interior designers consistently find that placing a mirror on a wall perpendicular (adjacent) to a window is far more effective. In this position, the mirror captures the light coming in from the side and reflects it across the room, illuminating the opposite, darker corners. It acts like a redirecting tool, grabbing the light and sending it on a new path deep into the space, instead of simply bouncing it back at the source.
Furthermore, a mirror’s job is to reflect. If the view outside the window is uninspiring—a brick wall, a dreary alley, or a cluttered neighboring yard—placing a mirror opposite it will simply double that negative visual information, making the room feel more enclosed and cluttered. As design professionals often advise, you should only mirror a view that is worth seeing twice. If the view is subpar, the perpendicular placement strategy allows you to capture the *light* from the window without having to reflect the *view* itself.
Why Lighting Candles Changes the Thermal Perception of a Room?
Even without generating significant heat, the simple act of lighting a few candles can make a room feel warmer and cozier. This phenomenon is rooted in the psychology of color temperature. The light from a candle flame has a very low color temperature, typically around 1850 Kelvin (K). This is a deep, amber-orange glow that our brains associate with fire, sunsets, and warmth. This psychological association is so strong that it can change our “thermal perception” of a space, making it feel more comfortable and inviting on a cold evening.
As a designer, you can harness this effect by pairing candlelight with the right reflective materials. The warm 1850K light interacts very differently with various metals. As lighting design experts note, this warm light will make brass and copper surfaces glow with intense, rich color, amplifying the cozy effect. In contrast, cool-toned metals like chrome or nickel will appear dull and lifeless under the same light. Placing a group of candles in front of a brass tray or inside a copper-lined lantern will multiply this warm glow exponentially.
This principle also makes candles an excellent tool for testing your decor’s reflective potential at night. Before investing in new pieces, you can move a few flameless candles around your room after dark. Place them in front of different surfaces—a mirror, a metallic frame, a glass vase—and observe which ones create the most appealing glow. This simple test reveals which of your existing decor items can be activated at night to create a layered, warm ambiance. You are essentially auditioning your accessories to see which ones perform best under “warm light” conditions, allowing you to create a cozy evening atmosphere with minimal effort.
Key Takeaways
- The science of light is your best tool: Brightening a space is about managing reflection angles and material properties, not just adding more light sources.
- Finish is as important as color: Use high-LRV matte paint for general diffusion and high-gloss paint for strategically directing light into dark areas.
- Balance is crucial: Avoid the “Disco Effect” by mixing reflective (specular) surfaces with matte, textured (diffuse) ones to create a serene, balanced brightness.
How to Position Pendant Lighting Over a Dining Table for Perfect Ambiance?
While this guide focuses on harnessing natural light, your artificial lighting fixtures shouldn’t be excluded from this holistic strategy. A pendant light over a dining table, for example, is more than just a source of illumination for meals. Its placement and material are a 24/7 design choice. The key is to position it not just for perfect light distribution when it’s switched on, but in a spot where its own reflective or translucent surfaces will interact with natural light during the day.
Think of your pendant light as a piece of daytime sculpture. Does your dining area catch the morning sun? A pendant made of brass or with copper details will catch that light and cast a warm glow, even when turned off. Is the fixture made of bubbled or colored glass? It can act as a “sun-catcher,” creating subtle patterns and colors on your walls as the daylight passes through it. The goal is to choose and place fixtures that contribute to the room’s brightness and character around the clock.
This integrates the concepts we’ve discussed into a unified approach. Your pendant light becomes part of the passive lighting system. Its metallic finish complements the other accents in the room, its height is considered in relation to the sun’s path, and its very presence adds to the layered texture of reflections. By considering its daytime role, you ensure that every element in your room is working together to create a space that feels dynamic, thoughtful, and, most importantly, naturally bright.
Now, you have the tools not just to decorate, but to sculpt with light. Begin applying these principles today to transform your home into a brighter, more energizing sanctuary.
Frequently Asked Questions About Brightening Dark Spaces
How do I know if my mirror placement creates disruptive glare?
Check if the reflection is in your direct line of sight from primary seating positions (sofa, desk chair). Mirrors should be hung at eye level but positioned to reflect attractive features, not create blinding spots.
What’s the difference between ambient brightening and the ‘disco effect’?
Ambient brightening lifts overall light levels evenly, while the disco effect creates moving reflections or hotspots that draw attention and cause visual discomfort.
How can I fix existing problematic reflections?
Layer different finishes (matte, satin, polished) to create balanced light distribution, avoid placing mirrors directly opposite each other, and ensure reflective surfaces don’t catch moving elements like trees outside.