The fear of a home extension looking like a mismatched, ‘bolted-on’ afterthought is a common concern for homeowners. The solution lies beyond simply matching materials. True architectural integration is an art of illusion, focusing on the subtle yet critical transitions of structure, proportion, and texture. By mastering the details of how new and old connect—from rooflines and floor levels to the very mortar between the bricks—you create a cohesive design that feels both intentional and inevitable, enhancing your home’s character and value.
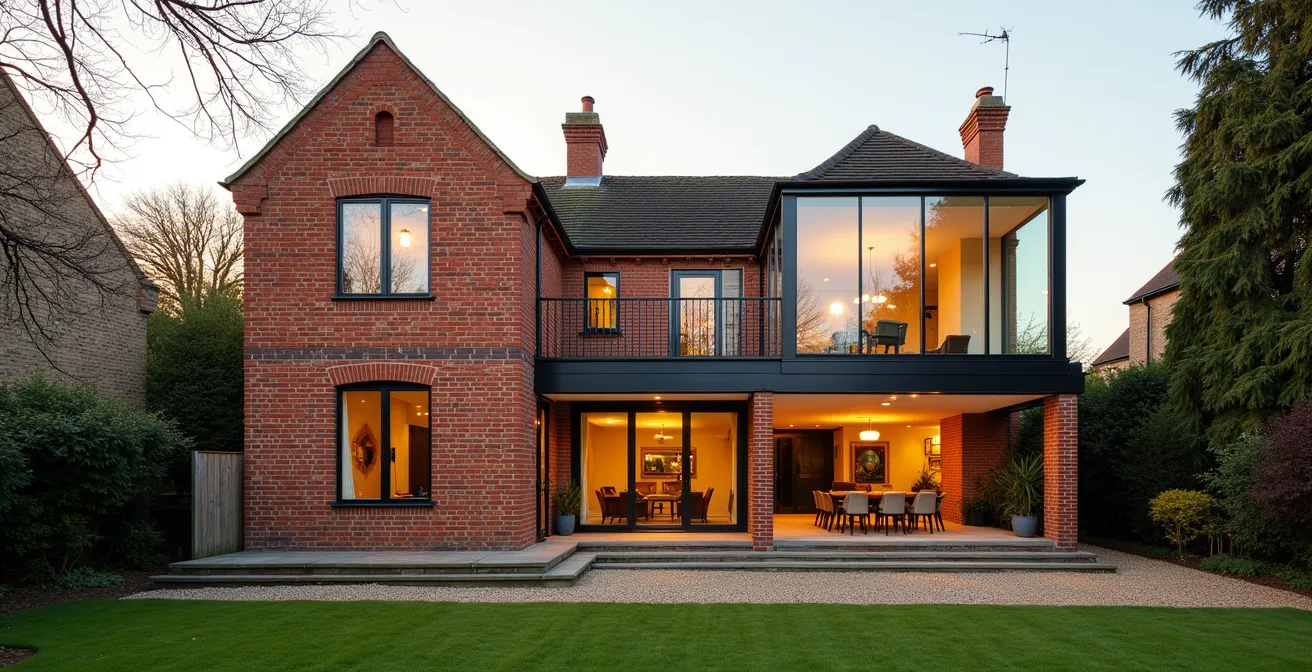
Embarking on a home extension project is filled with excitement and potential. Yet, beneath the surface of envisioning more space lies a significant architectural challenge: the fear of the “bolted-on” look. This is the tell-tale sign of an addition that fails to integrate with the original structure, creating a jarring visual disconnect that can undermine the property’s character and charm. While many focus on the obvious, like finding matching bricks or roof tiles, the secret to a truly seamless extension is far more nuanced. In fact, studies show that homes with cohesive, well-integrated additions are not just more beautiful; they also sell significantly faster.
The common advice to simply “respect the original style” often falls short because it doesn’t explain how. The real work is in the architectural details—the subtle decisions that trick the eye into seeing one unified building. It’s an exercise in mastering what can be called a home’s “visual grammar,” where every element, from the pitch of a roof to the height of a skirting board, speaks the same design language. This guide moves beyond the basics of material matching to explore the architectural principles of articulation and transition. We will not just tell you what to do; we will explain why it works.
This perspective transforms the challenge from a simple construction job into an act of architectural choreography. We will deconstruct the process, revealing how to manage structural connections, align floor levels, and choose materials with an expert eye. By focusing on these critical junctions, you can ensure your new space feels like an inevitable and harmonious continuation of your home’s story, not a clumsy footnote.
To guide you through this detailed process, this article breaks down the essential considerations for achieving a truly seamless home extension. The following sections will provide expert insights and practical steps for each critical phase of the project.
Summary: Seamless Home Extensions: Matching New Brickwork to an Old House
- How to Connect a New Roof Pitch to an Existing Structure Without Leaks?
- The Step-Down Problem: How to Flush-Mount Floors in an Addition?
- Where to Find Salvaged Bricks That Match Your 1920s Facade?
- Glass Link Corridors: The Modern Solution for Connecting Old and New
- How to Live in Your House During a Major Extension Project?
- How to Blend Victorian Features with Modern Minimalism Without Clashing?
- Why Your Green Oak Frame Cracks and Shrikes in the First 2 Years?
- What Are the Most Cost-Effective Energy Efficiency Upgrades for 1980s Homes?
How to Connect a New Roof Pitch to an Existing Structure Without Leaks?
The roofline is arguably the most defining characteristic of a house, and its successful extension is a matter of both structural integrity and aesthetic harmony. A poorly executed roof connection is the most obvious giveaway of an addition. The key is to engage in a form of structural choreography where the new roofline respects the old. Whenever possible, the ridge of the new extension should sit below the main house’s ridge. This creates a clear, respectful hierarchy between the original structure and the addition. If the pitches must differ, inserting a lower, flat, or gently sloped connecting section can create a deliberate and visually pleasing transition.
Matching the roof pitch is a fundamental element of the home’s visual grammar. A consistent angle ensures the extension reads as part of the original design. Beyond the pitch, the details are what sell the illusion. Replicating the original gable trim details, the depth of the overhangs, and the style of the fascias and soffits are non-negotiable. These small elements collectively define the character of the roof.
Finally, the choice of materials must be carefully considered. Using identical roofing materials is the simplest route to continuity. However, if a perfect match is impossible or a different material is desired for a distinct section (like a zinc roof on a contemporary box extension), the transition must be handled with deliberate architectural detailing. Proper flashing, weatherproofing, and a clear line of separation are critical to prevent leaks and ensure the connection is both visually clean and functionally robust for decades to come.
The Step-Down Problem: How to Flush-Mount Floors in an Addition?
Nothing breaks the flow between an old space and a new one more abruptly than an unexpected step. Achieving a flush, continuous floor level from the existing house into the extension is a hallmark of high-quality design and a critical component in creating a seamless experience. The “step-down problem” often arises due to differences in foundation depths or the need to accommodate modern, thicker floor insulation in the new build. Solving it requires careful planning with your architect and structural engineer from the very beginning.
The solution often involves either lowering the new foundation or, more commonly, adjusting the new floor joist system to precisely match the height of the existing floor. This requires meticulous measurement and may involve using engineered joists or a bespoke timber structure. The goal is a perfect, trip-free transition that allows flooring to run uninterrupted. As seen in a successful Barton Hills sunroom project, a seamless floor transition using matching limestone created a perfect visual flow that made the new space feel like it had always been there. This level of detail has a real impact, with well-executed living room expansions providing returns of 45-65%, partly due to this feeling of integrated space.
This macro-level photograph showcases the art of a perfect floor transition. The attention to detail in aligning the new and old materials is what creates the illusion of a single, continuous surface.
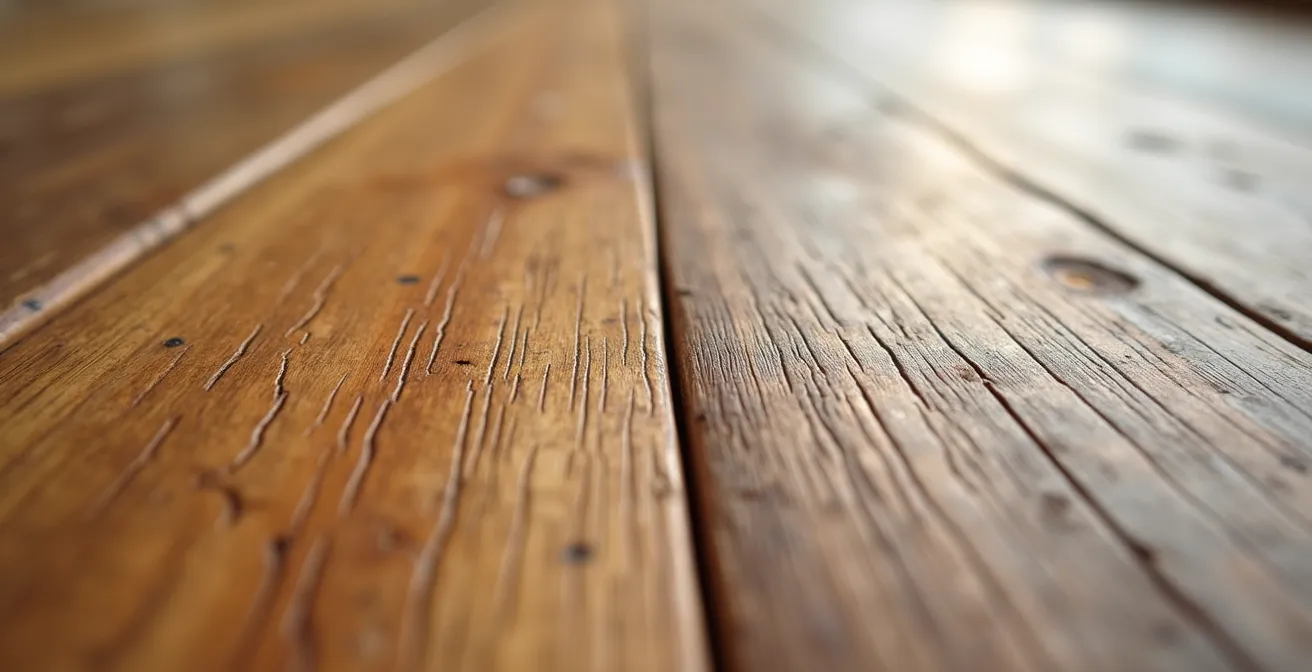
As the image demonstrates, once the structure is aligned, the final layer of the illusion is the material itself. Whether it’s sourcing reclaimed wood to match the patina of the original floorboards or finding a modern tile that complements the existing tones, the material choice completes the connection. The investment in this flawless structural alignment pays dividends in creating an open, unified living area.
Where to Find Salvaged Bricks That Match Your 1920s Facade?
For any brick house, matching the exterior is the ultimate test of a seamless extension. The character of an older facade comes from decades of weathering, historical manufacturing processes, and the specific clay used in its era. Simply choosing a new brick of a similar color is rarely enough. The most authentic solution is to source reclaimed bricks from a salvage yard. These bricks, often from demolished buildings of the same period, will have the same dimensions, texture, and natural patina as your existing walls, offering the best chance at a perfect match.
However, the search for reclaimed materials can be challenging, with availability and quality varying. An excellent alternative is to work with specialist brick suppliers who can produce new bricks that replicate the look of older styles. But the brick itself is only part of the equation. The mortar is a surprisingly dominant visual element. Depending on the joint thickness, the mortar can represent 18-20% of the overall wall surface, and its color, texture, and tooling profile must be precisely matched. A lab analysis of your existing mortar can determine its exact composition of sand and lime or cement for perfect replication.
When an exact brick match proves elusive, brick tinting offers a final, powerful tool for achieving a seamless blend. This process involves applying a pigmented solution to the new brickwork after it has been built, permanently staining it to match the tones and variations of the old facade. The following table compares these primary methods.
| Method | Cost | Pros | Cons |
|---|---|---|---|
| Reclaimed Bricks | Variable | Natural aging, character, exact period match possible | Limited availability, quality varies |
| New Matching Bricks | Moderate | Consistent quality, manufacturer warranties | May look too new initially |
| Brick Tinting Service | £40+ DIY | Perfect color match, lifetime guarantee available | Requires skill for large areas |
Ultimately, achieving material honesty is key. Whether through painstaking reclamation or expert tinting, the goal is to create a facade where the line between old and new is virtually invisible to the naked eye.
Glass Link Corridors: The Modern Solution for Connecting Old and New
Sometimes, the most seamless connection is one that is deliberately and beautifully distinct. Rather than attempting a potentially imperfect imitation of the old style, a modern glass link corridor creates an elegant “temporal bridge” between the original building and its new extension. This approach celebrates both the old and the new by creating a clear, light-filled separation. It allows each part of the building to retain its own architectural identity while being functionally connected.
This technique is not just a stylistic choice; it’s a respected conservation principle. As the experts at Architecture Republic note, this strategy of creating a discernible yet lightweight connection is widely endorsed for heritage structures. This is a form of architectural articulation that is both honest and respectful.
The Australian Burra Charter recommends this method with all heritage structures so that the old and the new are clearly discernible
– Australian Burra Charter, Architecture Republic
A glass corridor serves multiple practical purposes. It floods the adjacent interior spaces with natural light, often illuminating parts of the old house that were previously dark. It also creates a powerful visual connection to the garden, effectively blurring the lines between inside and out. The design can range from a minimalist, frameless glass box to a more structured enclosure with slender steel or timber frames that echo other materials in the home.
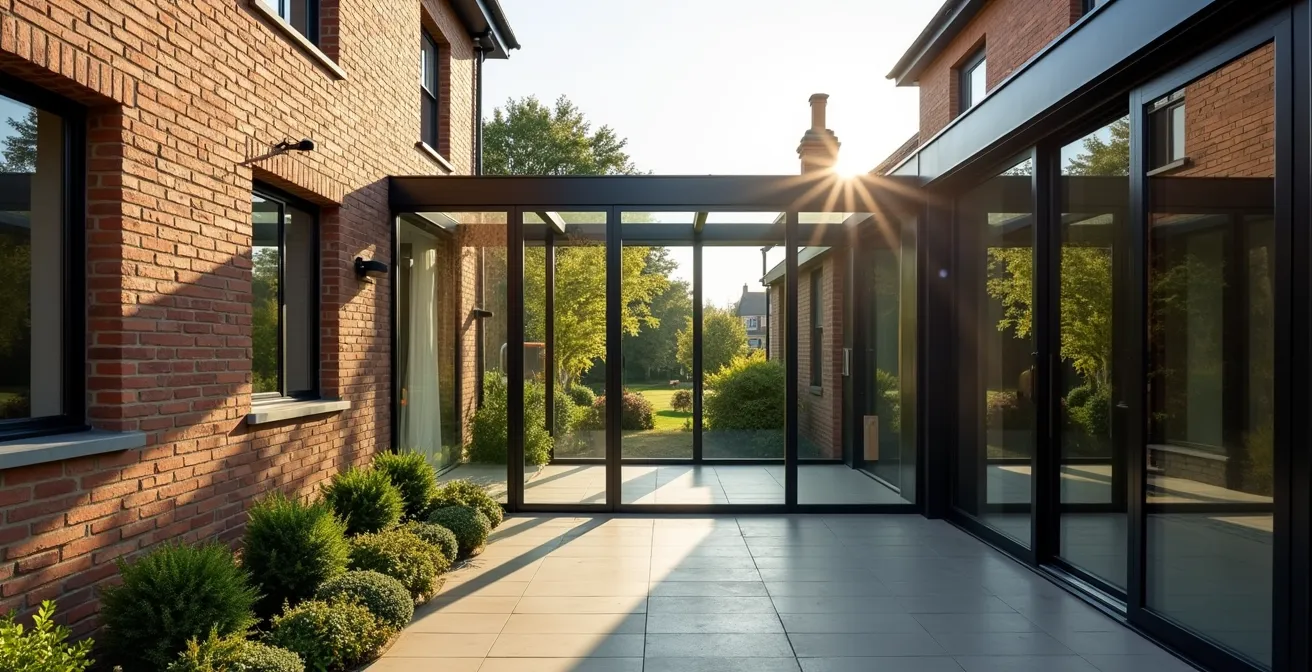
As this image illustrates, the transparency of the link provides a moment of visual pause. It allows the texture and character of the original brickwork to be appreciated from the inside while framing views of the modern extension and the landscape beyond. By choosing not to blend in, the glass link achieves a higher form of harmony—one based on respect rather than replication.
How to Live in Your House During a Major Extension Project?
Undertaking a major extension while still living in your home is a significant challenge that requires meticulous planning and a resilient mindset. The construction phase can be disruptive, with noise, dust, and a constant stream of activity. The typical timeline ranges from 8-16 weeks, but this can vary widely depending on complexity. The key to survival is establishing clear boundaries and protocols with your build team from day one. This begins with creating a detailed phasing plan that cordons off the construction zone from your living space, creating a sanctuary that remains as clean and functional as possible.
Dust is the relentless enemy of any in-situ renovation. To combat its migration, insist on the use of sealed plastic sheeting and consider renting negative air pressure machines. These devices create a gentle vacuum within the work zone, drawing air (and dust) from the living area into the construction space and venting it outside, rather than the other way around. Clear communication is equally vital. Schedule weekly site meetings with your builder to review progress, address concerns, and anticipate the schedule for the upcoming week. This prevents surprises and helps you plan around major disruptions, such as a temporary loss of water or power.
Financial and logistical preparation is just as important as physical separation. It is essential to have a contingency budget of 10-20% set aside to cover the unforeseen issues that inevitably arise in any project involving an old house. Finally, be realistic. For the most intensive phases of the project, such as major demolition or the ‘breakthrough’ when the old house is opened to the new, it may be wisest to arrange a temporary relocation for a few days or weeks. A little strategic planning can make the difference between a stressful ordeal and a manageable process.
Action Plan: Surviving Your Home Extension Project
- Phasing & Zoning: Work with your builder to create a detailed phasing plan, clearly defining the ‘livable zone’ and securing it from the construction area.
- Dust Control Systems: Mandate the use of sealed barriers and negative air pressure machines to actively manage and contain dust migration.
- Communication Protocol: Establish a fixed schedule for weekly site meetings to discuss progress, timelines, and any emerging issues.
- Financial Contingency: Secure a contingency fund of at least 10-20% of the total project cost to handle unexpected expenses without stress.
- Strategic Relocation: Identify critical project phases (e.g., major demolition, roof removal) and plan for a temporary off-site stay to preserve your sanity.
How to Blend Victorian Features with Modern Minimalism Without Clashing?
The marriage of ornate Victorian architecture with clean, modern minimalism is a design challenge that, when successful, can be breathtaking. The risk is creating a space that feels disjointed or, worse, where the two styles compete rather than complement each other. The secret to a harmonious blend is not to water down each style, but to let each express itself fully while finding a common thread. This thread is often found in proportion, light, and a shared palette of high-quality materials.
A successful approach involves retaining and celebrating the most compelling features of the Victorian era—such as intricate cornicing, ceiling roses, deep skirting boards, and original fireplaces. These elements become the “heritage” backdrop. The modern intervention should then be clean, uncluttered, and respectful. This can manifest in minimalist joinery that stops just short of the cornice, frameless glass doors that allow the original room proportions to be read clearly, or a simple, neutral color scheme that allows the Victorian details to stand out as features in their own right. The key is to establish a clear dialogue where the new honors the old by giving it space to breathe.
Case Study: Winchester Victorian Villa Modern Extension
In a project by AR Design Studio, a striking modern extension was added to a three-storey Victorian villa in Winchester. The owners’ goal was to maximize space and natural light without compromising the home’s traditional character. The design solution was to create a modern space with 3-metre-tall ceilings, directly matching the grand proportions of the existing Victorian rooms. This continuity of scale, combined with vast glazing, created a space that felt both modern and perfectly in tune with the original home’s “visual grammar,” proving that shared principles of scale and light can bridge a century of style.
The transition between the two zones is critical. Using a consistent flooring material throughout both the old and new spaces can be a powerful unifying element. Likewise, maintaining a strict, limited color palette across both areas helps to tie them together. The contrast between the ornate, detailed character of one space and the restrained simplicity of the other becomes a deliberate and dynamic feature of the home, rather than an accidental clash of styles.
Why Your Green Oak Frame Cracks and Shrikes in the First 2 Years?
A green oak frame extension brings unparalleled warmth, character, and a sense of timeless craftsmanship to a home. However, unlike working with inert materials like steel or concrete, building with green oak means working with a living material. Green oak is freshly cut timber with a high moisture content. As it slowly dries over the first few years in your home, it will inevitably shrink, twist, and crack. These movements are not a sign of failure; they are the defining characteristic of the material and a part of its rustic charm.
The cracks, known as “shakes,” and the creaking sounds are a result of the timber settling into its new environment and reaching equilibrium with the ambient humidity. An experienced oak frame designer and carpenter anticipates this movement. Joints are traditionally designed using pegged mortise and tenon connections, which are engineered to tighten as the timber shrinks, making the frame stronger over time. The key is to understand this process and embrace it. A perfectly uniform, crack-free oak beam is not the goal; the beauty lies in the natural, evolving texture of the wood.
The skill of the craftsman is paramount in ensuring the frame’s long-term integrity. They must account for the shrinkage in every cut and joint, a process that relies on centuries of building knowledge.

When combined with modern elements, the effect can be stunning. As seen in a 17th-century home in West Yorkshire, an exposed oak frame was paired with extensive frameless glazing. This juxtaposition of ancient, tactile material with modern, minimalist glass creates a powerful architectural statement. Understanding that your oak frame will “live” and change during its first few years is the first step to truly appreciating its unique and enduring beauty.
Key Takeaways
- Seamlessness is an art of illusion, achieved by mastering the transitions of structure, light, and texture.
- Respect the original home’s “visual grammar” by replicating proportions, pitches, and details, not just materials.
- A deliberate, modern connection like a glass link can be more respectful and harmonious than a poor imitation.
- Plan for the practical realities: anticipate dust, establish clear communication, and secure a 10-20% contingency budget.
What Are the Most Cost-Effective Energy Efficiency Upgrades for 1980s Homes?
While the primary focus of a seamless extension is often aesthetic and spatial, it presents a golden opportunity to dramatically improve your home’s overall energy performance, particularly for housing stock from the 1980s. These properties were often built with minimal insulation and single-glazed windows, making them notoriously inefficient by today’s standards. The most cost-effective upgrade you can make during an extension is to invest heavily in the building envelope of the new structure. This means specifying high levels of insulation for the walls, floor, and roof, far exceeding the minimum building regulations.
Windows and doors are the next critical area. Installing high-performance double or triple-glazed units in the extension is a given. However, the project provides a logical moment to plan a phased replacement of the windows in the original part of the house as well. This creates a consistent aesthetic and, more importantly, eliminates the thermal weak spots of the old glazing. Improving airtightness is another highly effective upgrade. During construction, careful attention should be paid to sealing all joints, gaps, and service penetrations in the new extension to prevent drafts and heat loss.
These upgrades not only reduce your energy bills and carbon footprint but also significantly increase the comfort and value of your home. A well-designed, highly efficient extension transforms the perception of the entire property. While kitchen extensions can yield impressive returns of up to 60-80%, the added value from a cohesive and energy-efficient project is even greater. According to a study by the Nationwide Building Society, such holistic improvements can significantly elevate a property’s market position.
Ultimately, a successful extension is more than just added square footage; it’s a long-term investment in your home’s functionality, comfort, and financial value. As confirmed by Nationwide Building Society, home improvements that add floor area can add up to 25% to a property’s value. By applying these principles of seamless design, you can ensure your project realizes its full potential.