The frustrating truth is that most solar path lights are not engineered to survive winter; they are designed to be disposable.
- Longevity isn’t about brightness (lumens) but about superior internal components: a LiFePO4 battery for cold tolerance and a monocrystalline panel for charging efficiency.
- The “cheap” look of many solar lights comes from using cool white (5000K) light; professional-grade fixtures use warm white (3000K) for a high-end, inviting ambiance.
Recommendation: To guarantee year-round performance, ignore marketing hype about brightness and instead demand a LiFePO4 battery, a monocrystalline panel, and a 3000K color temperature.
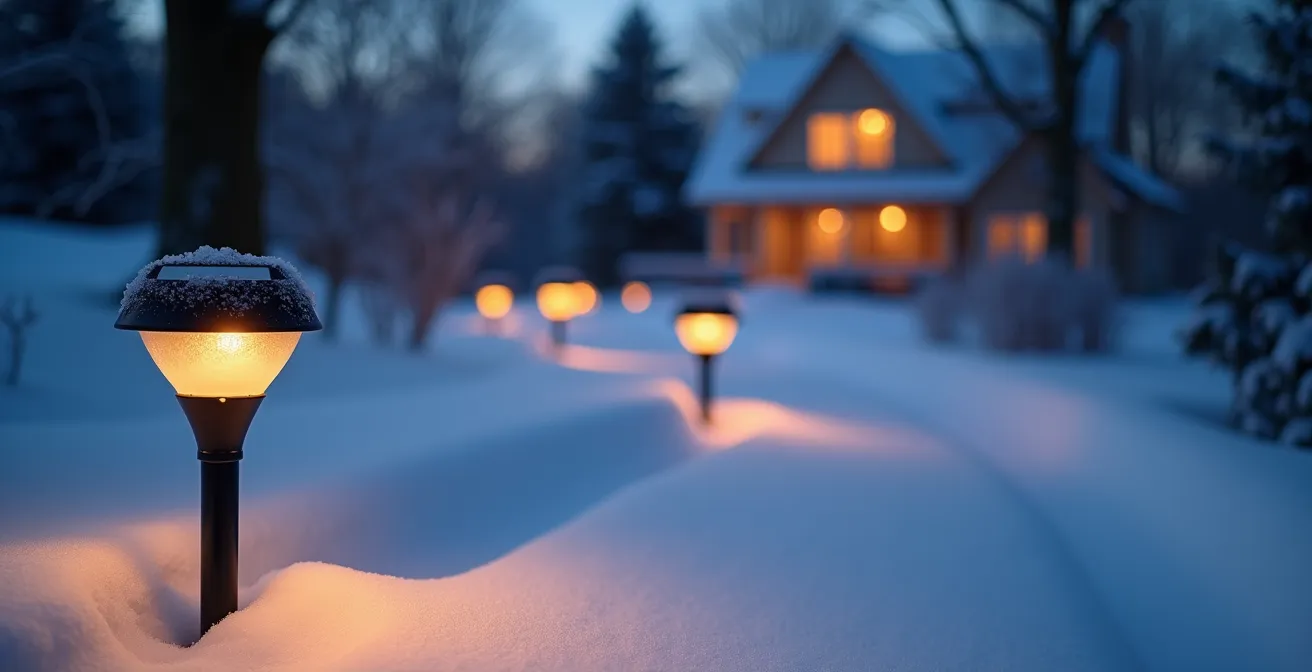
For many homeowners, the annual cycle of solar path lights is a familiar disappointment. You install them in spring, enjoy them through summer, and watch them flicker and die by the first frost, turning your investment into plastic lawn debris. The market is flooded with flimsy, low-cost options that promise effortless ambiance but deliver only a season’s worth of weak, unreliable light. This cycle of replacement is not just frustrating; it’s wasteful and expensive in the long run.
The common advice—clean the panels, ensure they get sun—is a classic case of treating the symptom, not the disease. The problem isn’t usually maintenance; it’s fundamental engineering. Most off-the-shelf solar lights are built with components that are fundamentally incapable of handling the dual challenge of shorter winter days and freezing temperatures. They use inferior battery chemistry that loses capacity in the cold and less efficient solar panels that can’t generate enough power from the low-angled winter sun.
But what if the secret to durable, all-season solar lighting wasn’t in finding a brighter LED, but in understanding the non-negotiable engineering choices that separate a resilient fixture from a disposable gadget? This guide moves beyond the superficial specifications. We will deconstruct the three critical pillars of a winter-proof solar light: the battery chemistry that dictates cold-weather survival, the panel and controller technology that governs charging efficiency, and the quality of light itself that defines the line between cheap-looking glare and sophisticated landscape design.
By focusing on these core technical elements, you can finally break the replacement cycle and choose solar-powered path lights that are a true long-term asset to your home, providing safety and ambiance reliably, winter after winter.
In this comprehensive guide, we’ll dissect the essential components and design principles that define a truly durable solar path light. The following sections will equip you with the knowledge to make an informed, long-lasting investment.
Summary: A Reviewer’s Guide to Winter-Proof Solar Path Lights
- Lithium vs NiMH: Which Solar Light Battery Survives Cold Better?
- How Many Lumens Do You Actually Need to Light a Path Safely?
- The spacing Mistake That Creates ‘Runway’ Looks on Garden Paths
- How to Polish Clouded Solar Panels to Restore Charging Efficiency?
- 3000K vs 5000K: Why Cool White Solar Lights Look Cheap in Gardens?
- Microinverters vs String Inverters: Which Handles Shade Better?
- How to Light a Dinner Table Outdoors Without Attracting Moths?
- How to Position Pendant Lighting Over a Dining Table for Perfect Ambiance?
Lithium vs NiMH: Which Solar Light Battery Survives Cold Better?
The single most critical component for winter survival is the battery. While most manufacturers bury this specification, it’s the primary point of failure. The majority of budget solar lights use Nickel-Metal Hydride (NiMH) batteries, which are cheap but perform poorly in cold weather. As temperatures drop, their internal chemical reaction slows, drastically reducing their ability to hold a charge. This is why a light that works for eight hours in summer might barely last one hour in winter, if it turns on at all.
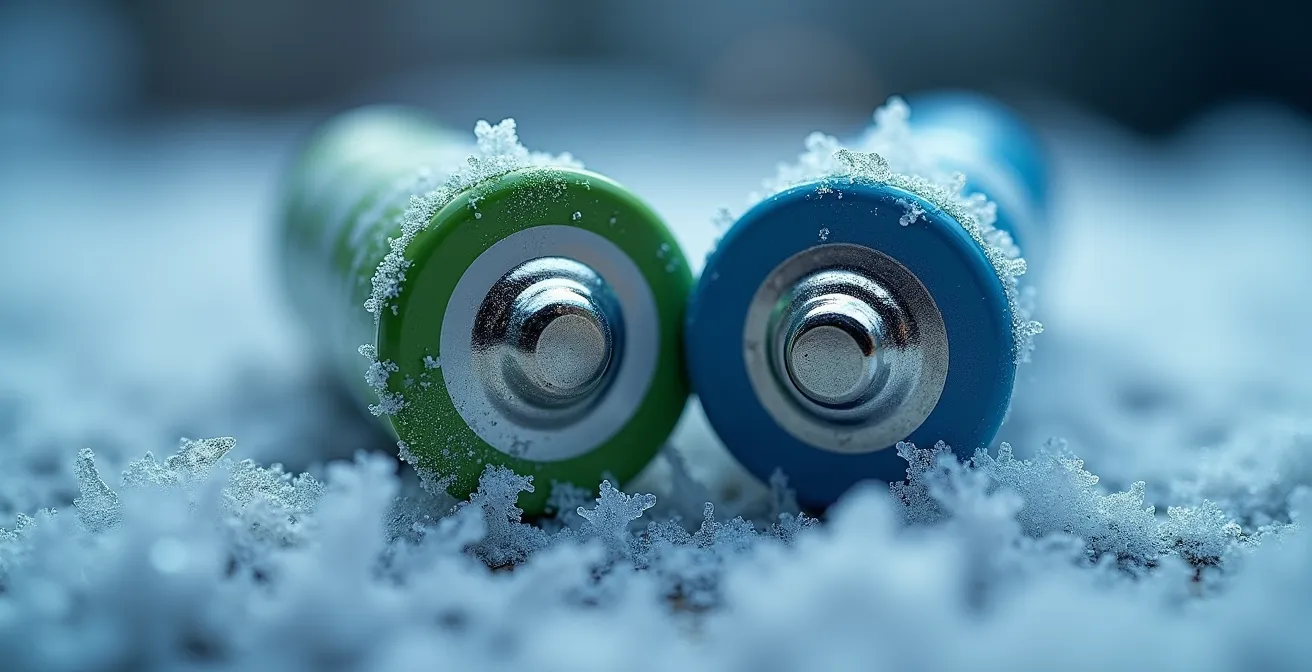
The professional-grade solution is a different type of lithium battery: Lithium Iron Phosphate (LiFePO4). Unlike the lithium-ion batteries in your phone, LiFePO4 is exceptionally stable and built for harsh conditions. Research shows that LiFePO4 batteries operate effectively from -20°C to 60°C and can last three to five times longer than their NiMH counterparts. This superior chemistry means they not only survive the cold but also maintain a much higher percentage of their charging capacity, ensuring your lights stay on longer into the dark winter nights.
When you’re evaluating a solar light, digging for the battery type is non-negotiable. If the manufacturer specifies “LiFePO4,” it’s a strong indicator that the product is engineered for longevity rather than built to a low price point. The difference in performance is not incremental; it’s fundamental.
The data clearly shows the superiority of LiFePO4 technology for any outdoor application in a climate with cold winters. This table, based on an analysis of cold-weather battery performance, illustrates the stark contrast.
| Battery Type | Operating Temperature | Capacity at -20°C | Cycle Life |
|---|---|---|---|
| LiFePO4 | -20°C to 60°C | 85% retention | 2000+ cycles |
| NiMH | -20°C to 45°C | 50% retention | 500-1000 cycles |
| NiCd | -40°C to 50°C | 70% retention | 300-500 cycles |
Ultimately, choosing a light with a LiFePO4 battery is the first and most important step in breaking the cycle of annual replacement.
How Many Lumens Do You Actually Need to Light a Path Safely?
Lumens have become the primary marketing metric for solar lights, leading to a “brightness war” that often misguides consumers. The truth is, more lumens are not always better. The goal of path lighting is to provide safe navigation and create a pleasant ambiance, not to illuminate your garden like a sports stadium. Excessively bright lights create harsh glare, destroy night vision, and often indicate a cheap fixture that is overcompensating for poor light quality and distribution.
For most residential applications, the sweet spot for pathway illumination is between 100 and 200 lumens per fixture. According to lighting professionals, this range provides clear visibility of the path’s surface without being offensively bright. It allows the eyes to adjust comfortably and preserves the subtle beauty of the surrounding landscape. Anything significantly higher is often unnecessary and can contribute to light pollution, annoying both you and your neighbors.
A well-designed fixture uses its lumens efficiently. Instead of just blasting light in all directions, it directs it downward onto the path where it’s needed. This is why a high-quality 100-lumen fixture with good optics can be more effective and look far more sophisticated than a cheap 500-lumen “spotlight” that creates more glare than usable light. Focus on the quality of the illumination, not just the raw quantity of lumens.
Consider the specific function of the area you are lighting to select the appropriate brightness:
- Garden paths and decorative beds: 50-100 lumens is often sufficient for creating a pleasant atmosphere and highlighting textures.
- Main walkways and steps: 100-200 lumens are recommended for clear visibility and safe navigation, ensuring trip hazards are visible.
- Security areas or dark entryways: 200-400 lumens can provide enhanced safety and act as a deterrent, but should be used sparingly.
Many advanced models now offer a “dual mode” operation, where they stay at a low ambient level (e.g., 50 lumens) and brighten to a higher level (e.g., 200 lumens) when motion is detected, a clever way to conserve precious winter battery life.
Instead of chasing the highest lumen count, seek out fixtures that provide a useful, controlled light output in the 100-200 lumen range.
The spacing Mistake That Creates ‘Runway’ Looks on Garden Paths
One of the most common and visually jarring mistakes in DIY landscape lighting is improper spacing. When path lights are placed too close together in a rigid, straight line, the result is the dreaded “runway” or “airport landing strip” effect. This creates a stiff, unnatural look that cheapens the appearance of the entire garden. The goal is to create gentle, overlapping pools of light that guide the eye and feet organically, not to create a rigid, militaristic line.
Professional lighting designers achieve a more natural look by staggering the lights on alternating sides of the path and varying the distance between them. As a general rule, a wider spacing is often better. For a balanced and aesthetically pleasing layout, designers recommend a spacing of 10-15 feet between lights. This allows each fixture to cast a distinct pool of light that just touches the edge of the next, creating a seamless and inviting journey rather than a dotted line.
The optimal spacing also depends on the light’s beam spread. A fixture that casts a wide, 360-degree wash of light can be placed further apart than one with a narrow, focused beam. Before installing, it’s a great practice to wait until dusk and test the placement of one or two lights to see how their light pools interact. You’re looking for a soft-edged overlap, not a series of disconnected, bright hotspots.
Case Study: The Winter-Optimized Placement Strategy
Beyond simple spacing, winter performance requires a specific placement strategy. Lighting experts advise creating a separate “winter lighting plan.” In summer, solar panels can be nearly flat (5-10 degree tilt), but in winter, they must be tilted to 45-60 degrees to capture maximum energy from the low-hanging sun. This often means physically repositioning lights from their summer locations to spots that avoid new shadow patterns cast by leafless trees or buildings. Furthermore, in the northern hemisphere, ensuring all panels face directly south is critical for maximizing charge during the shortest days of the year.
By embracing staggering, wider spacing, and a winter-specific plan, you can elevate your path lighting from a functional necessity to a sophisticated design element.
How to Polish Clouded Solar Panels to Restore Charging Efficiency?
While a quality solar light should require minimal maintenance, the one unavoidable task is keeping the solar panel clean. A panel covered in dust, pollen, or hard water spots can lose a significant portion of its charging capability. However, the bigger long-term issue is not surface dirt but permanent clouding or “fogging” of the panel itself. This is a tell-tale sign of a cheap light.
This clouding is caused by the degradation of the panel’s protective surface, usually made of low-grade polycarbonate plastic. When exposed to UV radiation and weather, this plastic hazes over, blocking sunlight and crippling the light’s ability to charge. Once this happens, no amount of polishing can restore it; the material itself has failed. The key is to prevent this from ever happening by choosing the right materials from the start. Look for solar lights that explicitly state they use a tempered glass panel cover. Glass is impervious to UV degradation and will remain crystal clear for the life of the product.
Equally important is the type of solar cell underneath. High-quality fixtures use monocrystalline silicon panels. These are more efficient at converting sunlight to energy, especially in the overcast conditions common in winter. Field testing demonstrates that monocrystalline panels can charge up to 30% faster in low-light winter conditions than the cheaper, less efficient polycrystalline panels (often identifiable by their fragmented, blue appearance).
Your Action Plan: Winter Solar Panel Maintenance
- Select Smartly: Prioritize lights with tempered glass panels over polycarbonate to prevent permanent clouding from UV exposure.
- Clean Regularly: Once a month, wipe panels with a damp microfiber cloth to remove dust, pollen, and grime that block sunlight.
- Coat for Winter: Before the first snowfall, apply a hydrophobic coating (like Rain-X) to the glass. This helps snow and ice slide off instead of accumulating.
- Remove Snow Gently: Use only a soft-bristled brush to clear snow from panels. Never use hard plastic scrapers or de-icing chemicals, which can scratch and damage the surface.
- Plan Battery Replacement: Even the best batteries degrade. Plan to replace the LiFePO4 or NiMH batteries every 2-3 years with a new set of the exact same capacity (mAh) and type.
By investing in quality materials like tempered glass and monocrystalline silicon upfront, you largely eliminate the most common long-term failure points and ensure maximum charging efficiency for years to come.
3000K vs 5000K: Why Cool White Solar Lights Look Cheap in Gardens?
Beyond performance, the aesthetic quality of a solar light is defined by its color temperature, measured in Kelvin (K). This is perhaps the most overlooked specification, yet it has the single biggest impact on whether your garden looks inviting and high-end or stark and clinical. Cheap solar lights almost universally use cool white LEDs, typically 5000K or higher. This light has a harsh, bluish-white tint that flattens textures, washes out the natural colors of plants and stonework, and creates an unwelcoming, industrial feel.
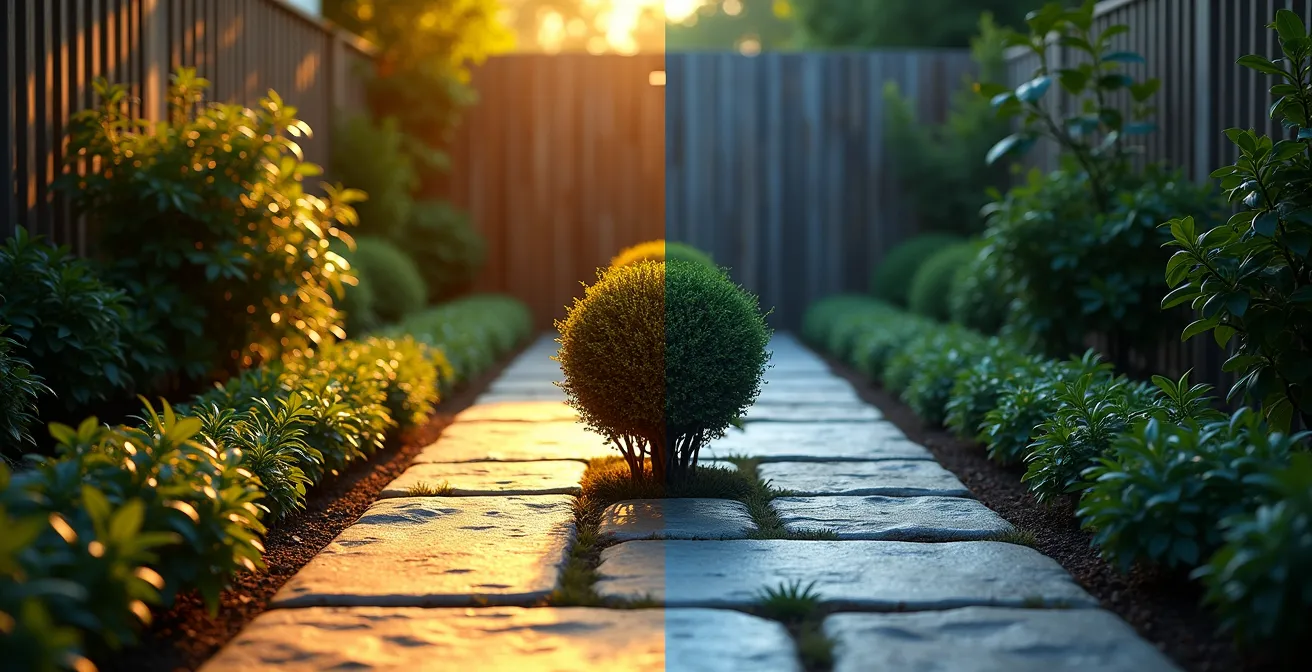
In contrast, virtually all professional landscape lighting uses warm white light, in the 2700K to 3000K range. This is the color temperature of traditional incandescent bulbs, and it creates a soft, golden-white glow that is cozy, inviting, and luxurious. Warm light enriches the greens of foliage, brings out the warm tones in wood and stone, and creates soft, pleasing shadows. As one design guide notes, this choice is fundamental to the mood of a space.
Warm white light (2700K-3000K) creates a cozy and comforting mood, suitable for relaxation. Natural white (around 3000K) offers a balanced and neutral feel, while cool white (above 4000K) can be more invigorating and is often used for tasks that require focus.
– Garden Lighting Design Guide, Gardenreet Landscape Lighting
The prevalence of cool white LEDs in budget solar lights is a manufacturing shortcut. They are often slightly cheaper and can appear “brighter” to the untrained eye, but this perceived brightness comes at the cost of all aesthetic subtlety. Choosing a fixture with a 3000K color temperature is one of the easiest ways to ensure your outdoor lighting looks intentional and professionally designed.
This comparative table, drawing from a landscape lighting color temperature guide, highlights how different Kelvin values create vastly different emotional responses.
| Color Temperature | Visual Effect | Best Application | Psychological Impact |
|---|---|---|---|
| 2700K | Warm golden glow | Patios, entertainment areas | Cozy, inviting, relaxing |
| 3000K | Natural white | General pathways, gardens | Balanced, welcoming |
| 4000K | Cool white | Modern architecture only | Alert, clinical feel |
| 5000K+ | Daylight blue-white | Security zones only | Harsh, unwelcoming |
For a garden path, the choice is clear: a 3000K fixture will always provide a more sophisticated and welcoming ambiance than its 5000K counterpart.
Microinverters vs String Inverters: Which Handles Shade Better?
While terms like “microinverters” and “string inverters” belong to the world of large-scale rooftop solar arrays, the core principle they address is directly relevant to the performance of a humble path light: how efficiently does the system convert solar energy, especially in less-than-ideal conditions like partial shade?
In a small solar light, this job is handled by a component called the solar charge controller. It’s the “brain” of the operation, managing the flow of energy from the panel to the battery. Budget lights use a simple, cheap technology called Pulse Width Modulation (PWM). A PWM controller is essentially an on/off switch; it’s inefficient and struggles to extract maximum power when the sun isn’t perfect, such as on cloudy days or when a shadow falls across part of the panel.
A high-quality solar light, however, employs a far more intelligent controller using Maximum Power Point Tracking (MPPT) technology. An MPPT controller is a sophisticated converter that actively hunts for the optimal voltage and current to extract the absolute maximum amount of power from the panel at any given moment. This is a game-changer in winter. Cold weather testing reveals that MPPT controllers can capture up to 30% more energy than their PWM counterparts in the weak and variable light of winter. That 30% boost can be the difference between a light that works all night and one that dies before you get home from work.
Just like with battery chemistry, manufacturers of high-end lights will often specify “MPPT controller” as a feature. It’s a hallmark of a product designed for performance and efficiency, not just a low price. While you won’t find a microinverter in a path light, looking for an MPPT controller is the equivalent of choosing the smarter, more resilient technology that will keep your lights running, even when the sun isn’t cooperating.
This intelligent energy management is a key, albeit invisible, feature that separates a truly reliable winter-proof light from the competition.
How to Light a Dinner Table Outdoors Without Attracting Moths?
Choosing the right path lighting has an unexpected but welcome side effect: it can dramatically reduce the number of insects swarming your outdoor living spaces. If you’ve ever had an evening on the patio ruined by a cloud of moths and other bugs dive-bombing your lights, the solution lies in understanding the science of light attraction.
Insects are most drawn to the shorter wavelengths of the light spectrum, specifically blue and ultraviolet (UV) light. This is why commercial bug zappers use a distinct blue/purple glow. As it turns out, the cheap, cool white (4000K-5000K) LEDs used in most budget solar lights emit a significant amount of blue-spectrum light, effectively turning your garden path into a series of bug beacons. This attracts them from all over your yard and right to your doorstep.
Moths and other insects are most attracted to the blue/UV end of the spectrum. This provides another strong, practical reason to choose warm white (2700K-3000K) path lights over cool white (4000K+), as they are inherently less attractive to bugs.
– Outdoor Lighting Design Principles, Solar LED Light Guide
By opting for warm white fixtures (2700K-3000K), you are choosing a light source that emits much longer, yellower wavelengths. This warm-toned light is far less visible and attractive to most nocturnal insects. The effect is a noticeably more pleasant and peaceful outdoor environment, especially near patios, decks, and outdoor dining areas. This practical benefit, combined with the superior aesthetic, makes the case for warm white light overwhelming.
To further minimize insect attraction, consider these additional strategies:
- Use Downward-Facing Fixtures: Select lights that are shielded on top and direct all light down onto the path, preventing upward “light spill” that attracts flying insects.
- Create Indirect Light: Position lights to illuminate a wall, fence, or hedge, using the reflected light to softly illuminate the nearby area rather than creating a bright, direct source.
- Consider Amber Tints: For areas extremely sensitive to bugs, such as right next to a dining table, look for fixtures with amber-tinted lenses, which shift the light even further into the yellow/red spectrum and are virtually invisible to most insects.
The choice of warm white light is not just about style; it’s a practical decision that contributes to a more comfortable and enjoyable outdoor living experience.
Key Takeaways
- Battery is King: For reliable winter performance, a Lithium Iron Phosphate (LiFePO4) battery is non-negotiable due to its superior cold tolerance and longevity over standard NiMH.
- Warm Light is Quality Light: A 3000K color temperature provides a sophisticated, high-end look and attracts fewer insects, while cool white (5000K+) is a hallmark of cheap fixtures.
- Efficiency Trumps Brightness: Look for a combination of a monocrystalline solar panel and an MPPT charge controller to maximize energy capture, especially on short, overcast winter days.
How to Position Pendant Lighting Over a Dining Table for Perfect Ambiance?
The principles that guide a designer in perfectly positioning a pendant light over an interior dining table—creating focus, defining a space, and crafting an ambiance—have direct parallels in professional landscape lighting. A well-lit garden path is not merely a series of individual lights; it’s a cohesive system designed to create an experience. The most sophisticated approach, borrowed directly from interior design, is called “layered lighting.”
Layered lighting involves using different types of fixtures and light levels to create depth, hierarchy, and visual interest. Instead of relying on one type of path light, a designer composes a scene with three distinct layers:
- Task Lighting: This is the primary role of path lights. Their job is to safely illuminate the walking surface, typically with a controlled downward wash of 80-120 lumens.
- Accent Lighting: This layer uses spotlights to draw attention to specific features like a beautiful tree, a stone wall, or a sculpture. This creates focal points and prevents the landscape from looking flat.
- Ambient Lighting: This is the soft, general “fill” light that ties the scene together. It might come from low-level wash lights, string lights in a pergola, or the gentle glow reflected off a house wall.
Case Study: Applying Layered Lighting to a Garden Path
A professional landscape designer might use the layering principle on a single path. They could use taller, more prominent bollard-style lights to mark the entrance and exit of the path (Accent), while using lower, mushroom-style lights to provide the main guidance along the walkway (Task). The whole scene might be tied together by the soft, indirect glow from a spotlight aimed at a nearby Japanese maple (Ambient). According to a guide on lighting design standards, path lights with a 360-degree beam spread, placed 6-8 feet apart, are ideal for creating the overlapping pools of light that form a seamless ‘task’ layer.
This layered approach is the antidote to the monotonous “runway” effect. It creates a rich, dynamic visual experience that feels custom and high-end. While you may be focused on just path lights, thinking about how they can serve as the “task” layer within a larger lighting scheme is the final step toward a truly professional result. Even just adding one accent spotlight on a key feature can transform the entire look of your garden.
By thinking like an interior designer and applying the concept of layering, you move beyond simple illumination and begin to truly shape the nighttime ambiance of your outdoor space.