Prioritizing upgrades based on diagnostic testing, not guesswork, yields the highest return on investment for 1980s homes.
- Attic insulation and comprehensive air sealing offer the fastest payback, often under 3 years, by directly addressing the largest sources of heat loss.
- Testing for air leakage is more cost-effective than preemptively replacing windows, which typically account for a smaller portion of the home’s total energy loss.
Recommendation: Start with a professional energy audit that includes a blower door test to create a customized, data-driven, and cost-effective upgrade plan for your specific property.
For owners of homes built in the 1980s, high energy bills can feel like an unavoidable reality. This era of construction, while efficient for its time, often featured minimal insulation, single-pane windows, and electrical systems not designed for modern loads. The common advice is a familiar list: replace windows, buy new appliances, or add insulation. While well-intentioned, this approach often leads to significant investment without a guaranteed return. Homeowners can spend tens of thousands on new windows only to find their heating bills barely budge.
The core issue is treating the symptoms rather than diagnosing the underlying problem. A house is a complex system, and its energy inefficiency is rarely due to a single component. The true key to maximizing your return on investment (ROI) isn’t following a generic checklist, but adopting a diagnostic-first approach. It’s about understanding precisely where *your* home is losing energy and in what order you should fix those leaks to achieve the fastest and most significant savings. This strategy transforms you from a consumer of expensive products into a strategic manager of your home’s performance.
This guide provides that data-driven framework. We will analyze the most common upgrades through the lens of an energy auditor, focusing on payback period and measurable results. We’ll start with the building envelope, move to the systems that consume energy within it, and conclude with how to leverage incentives and renewable generation. This roadmap is designed to help you make informed financial decisions that permanently lower your energy consumption and improve your home’s comfort.
This article provides a detailed roadmap for prioritizing your home energy upgrades based on return on investment. Explore the sections below to understand the data behind each decision and build a plan that works for your budget.
Summary: A Prioritized Roadmap to Energy Efficiency ROI
- Why Topping Up Attic Insulation Offers the Fastest Payback Period?
- Blower Door Test: Why You Need One Before Buying New Windows?
- Tankless vs Heat Pump Water Heater: Which Saves More for Families of 4?
- The Vampire Power Drain: How Much Do Standby Appliances Cost You?
- How to Stack Rebates for Energy Upgrades to Cover 30% of Costs?
- Why Old Wiring Layouts Waste 20% of Your Lighting Energy?
- When to Replace Your AC Unit: The 15-Year Efficiency Drop-Off
- Solar Panels for Residential Roofs: Is Battery Storage Necessary for ROI?
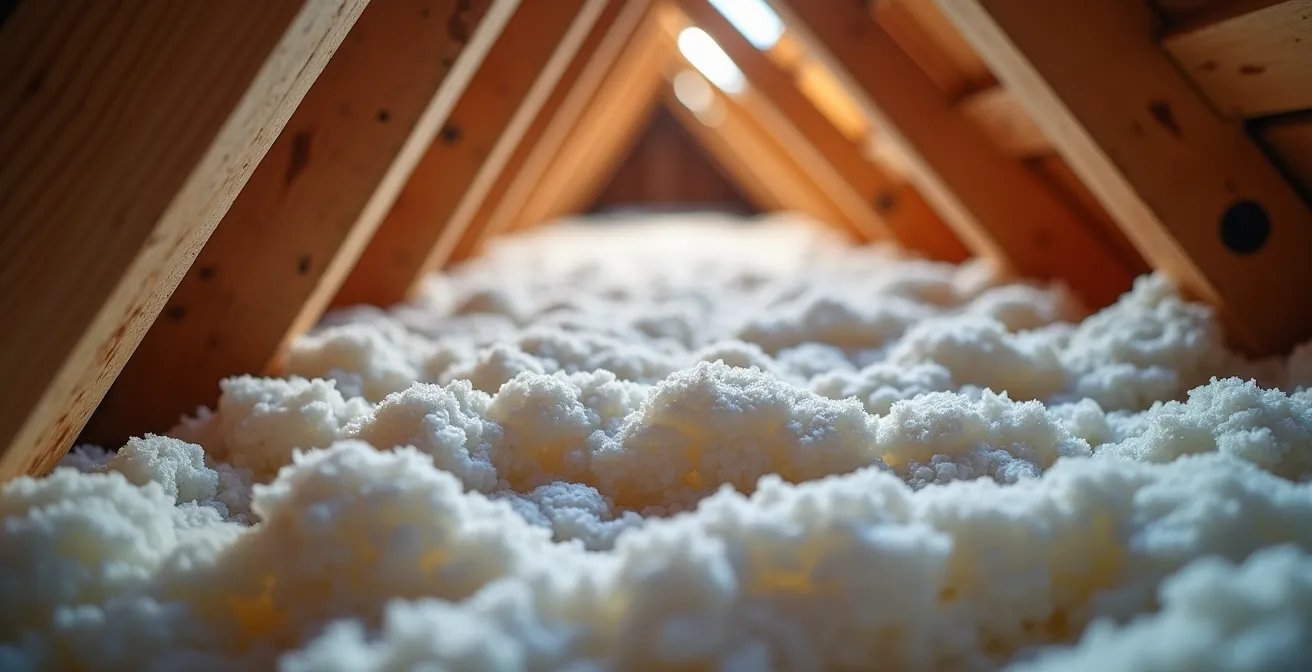
Why Topping Up Attic Insulation Offers the Fastest Payback Period?
From an ROI perspective, the single most effective upgrade for a typical 1980s home is addressing the attic. Because heat naturally rises, an under-insulated attic is like an open chimney for your heating budget in the winter and a giant heat radiator in the summer. Homes from this era were often built with an insulation level of R-19 or less, which is grossly inadequate by today’s standards. Upgrading this to a modern standard of R-38 to R-49 is not just an improvement; it’s a fundamental change to the home’s thermal performance.
The financial case is compelling. Unlike mechanical systems, insulation is a passive upgrade with no moving parts to fail, requiring zero maintenance while delivering savings every single day. The payback period for this investment is often the shortest of any major retrofit. For a relatively low upfront cost, homeowners can see a dramatic reduction in their heating and cooling needs, which are the largest components of a residential energy bill. The key is to pair insulation with air sealing to stop convective heat loss through gaps and penetrations before laying down the new material.
To understand the direct financial impact, it’s crucial to analyze the relationship between insulation levels and payback time. The following data, based on common upgrade scenarios for older homes, clearly illustrates the point of diminishing returns. Moving from a poor R-value to a good one provides massive savings, while subsequent upgrades offer smaller incremental benefits for a higher cost.
This data, adapted from an energy efficiency analysis by Bob Vila, demonstrates the clear ROI of bringing a 1980s-era attic up to modern code standards.
| Upgrade Level | From R-Value | To R-Value | Energy Savings | Payback Period |
|---|---|---|---|---|
| Basic Upgrade | R-19 (1980s standard) | R-38 | 20-30% | 2-3 years |
| Advanced Upgrade | R-38 | R-49 | 5-10% | 5-7 years |
| Maximum Upgrade | R-49 | R-60 | 2-3% | 10+ years |
As the table shows, the “sweet spot” for ROI is the initial upgrade to R-38, which can cut heating and cooling costs by 20-30% and pay for itself in just a few years. This is the foundational step in any cost-effective retrofit strategy.
Blower Door Test: Why You Need One Before Buying New Windows?
The most common expensive mistake homeowners make is replacing windows prematurely. While old windows are certainly not energy all-stars, they are often a surprisingly small part of a home’s overall air leakage problem. The real culprits are the hidden gaps and cracks in the building envelope: penetrations around pipes and wiring, unsealed attic access hatches, leaky recessed lighting, and gaps between the foundation and the framing. A blower door test is the diagnostic tool that makes these invisible leaks visible.
The test depressurizes your home, causing outside air to be sucked in through every crack. Using an infrared camera or smoke pencil, an auditor can pinpoint the exact locations of these leaks. Data from these tests consistently shows that uncontrolled air infiltration from the building envelope as a whole is a far greater source of energy loss than windows alone. In fact, multiple studies based on blower door testing data reveal that windows may account for only 10-15% of total air leakage in a typical 1980s house.
Spending $500 on a blower door test and targeted air sealing with caulk and spray foam can often yield greater energy savings than spending $20,000 on new windows. This “test before you invest” approach is the cornerstone of a smart retrofit. It ensures your money is spent fixing the largest problems first, maximizing your ROI and comfort. Only after the building envelope is properly sealed should you consider the more modest, incremental gains from window replacement.
Case Study: The Kelowna 1980s Home Retrofit
A couple in Kelowna with a typical 1980s home underwent comprehensive energy testing, including a blower door test. This revealed that the primary sources of heat loss were not just the windows, but also numerous air gaps in the exterior walls and attic. Instead of a costly full window replacement, they focused on targeted air sealing and insulation upgrades guided by the test results. The outcome was a reduction in annual energy consumption from 145 to 95 gigajoules—a 34% improvement achieved by addressing the specific leakage points identified by the diagnostics.
Tankless vs Heat Pump Water Heater: Which Saves More for Families of 4?
After sealing and insulating the building envelope, the next largest energy consumer to address is water heating. For most homes, this accounts for a significant portion of the utility bill, often around 18% of total energy consumption. A 1980s-era home is likely equipped with a standard storage tank water heater, which continuously heats a large volume of water, leading to constant standby energy losses. Upgrading to a modern, high-efficiency unit is a guaranteed path to savings, but the choice between a gas tankless water heater and an electric heat pump water heater (HPWH) depends heavily on your family’s specific usage patterns and home layout.
For a family of four with concentrated hot water usage—such as multiple showers during a morning rush—a gas tankless water heater often provides a better experience. It delivers unlimited hot water on demand, eliminating the risk of running out. Its efficiency comes from eliminating standby losses entirely. However, they have high upfront costs and may require upgrading gas lines, which adds to the expense.
Conversely, a heat pump water heater (HPWH) is typically the more energy-efficient option overall, using ambient air to heat water at up to 3-4 times the efficiency of a standard electric resistance heater. For a family with staggered water usage throughout the day, an HPWH is ideal. However, its performance is dependent on its environment; placing it in a cold, unconditioned basement can significantly reduce its efficiency. It also has a slower recovery rate than a gas tankless unit. The final decision requires a careful calculation of total ownership cost, factoring in installation, local utility rates, and available rebates.
The Vampire Power Drain: How Much Do Standby Appliances Cost You?
Vampire power, also known as phantom load, is the electricity consumed by appliances and electronics while they are turned off or in standby mode. In a 1980s home now filled with modern gadgets—TVs, cable boxes, game consoles, chargers, and smart speakers—this slow, constant drain can account for a surprising portion of your electric bill. Each device may only draw a few watts, but collectively, they operate 24/7, adding up to a significant and entirely wasteful expense over the course of a year.
Tackling vampire power doesn’t require a large investment and offers a quick ROI. The strategy can be broken down into three tiers, allowing you to choose the level of effort and investment you’re comfortable with. The simplest actions cost nothing but a change in habits, while modest investments can automate the process and deliver measurable savings within months. This is low-hanging fruit that every homeowner should pick to trim energy waste.
The most effective approach involves a combination of behavioral changes and low-cost technology. Here is a simple framework to guide your efforts:
- Tier 1 (Free, Immediate Payback): The most direct method is to simply unplug devices when they are not in use. Focus on entertainment systems (TV, soundbar, consoles) and clusters of chargers, which are often the biggest offenders. Make this a nightly or pre-vacation routine.
- Tier 2 (Low-Cost, <6 Month Payback): Install smart power strips. These devices cost between $20-$40 and automatically cut power to peripheral devices (like a Blu-ray player or game console) when a primary device (the TV) is turned off. This automates the process of unplugging.
- Tier 3 (Strategic Upgrade, Long-Term ROI): When it’s time to replace an appliance, make standby consumption a key factor in your purchase decision. Look for ENERGY STAR certified models, which are designed to have minimal standby power draw, often less than 1 watt.
How to Stack Rebates for Energy Upgrades to Cover 30% of Costs?
A critical component of maximizing the ROI of any energy retrofit is strategically leveraging financial incentives. These are not just a bonus; they should be treated as a core part of your project’s financial plan. A combination of federal tax credits, state-level grants, and local utility rebates can often be “stacked” to cover a significant portion of your upfront costs. For major upgrades like insulation, new HVAC systems, or heat pump water heaters, these incentives can dramatically shorten the payback period.
The most significant incentive available to many homeowners is the 30% federal tax credit for qualified energy efficiency improvements, which can provide up to $3,200 annually. This can be combined with rebates from your local gas or electric utility, which may offer several hundred dollars for installing a high-efficiency furnace or heat pump. Some states or municipalities offer additional programs. The key is to research all available incentives *before* you begin work, as some require pre-approval.
Meticulous documentation is non-negotiable for successfully claiming these funds. Each program has specific requirements, and failure to provide the correct paperwork can result in a denied claim. Acting as your own project manager and maintaining a detailed file from start to finish is essential. This proactive approach ensures you transform these incentives from a possibility into a reliable funding source for your retrofit.
Your Action Plan: Assembling Your Rebate Documentation
- Pre-Approval First: Before purchasing equipment or starting work, verify which rebates require pre-approval and submit the necessary applications.
- Collect Certificates: For all HVAC equipment, obtain the AHRI (Air-Conditioning, Heating, and Refrigeration Institute) certificates that officially document the model numbers and efficiency ratings.
- Verify Contractor Credentials: Keep a record of your contractor’s license number and business registration information, as this is often required on rebate forms.
- Keep Detailed Invoices: Insist on dated, itemized invoices that clearly list the make, model number, and cost of all installed equipment. Vague receipts will be rejected.
- Document Everything: Take “before” and “after” photos of the project area and equipment. Keep copies of your pre- and post-upgrade energy evaluation results.
Why Old Wiring Layouts Waste 20% of Your Lighting Energy?
While switching to LED bulbs is the most obvious lighting upgrade, it doesn’t address a hidden inefficiency in many 1980s homes: the wiring itself. Electrical layouts from that era often used long, “daisy-chained” circuits, where a single circuit would power numerous outlets and fixtures across multiple rooms. This design creates a phenomenon known as voltage drop. As electricity travels down a long, thin wire, its voltage decreases, forcing appliances and bulbs at the end of the circuit to draw more current (amps) to produce the same power (watts), resulting in wasted energy as heat.
An electrical efficiency expert aptly describes the problem with an analogy. This issue is particularly pronounced with modern, sensitive electronics and lighting.
Long, daisy-chained 1980s wiring circuits act like a long, skinny garden hose, delivering less pressure (voltage) at the end.
– Electrical efficiency expert, Energy retrofit analysis
While a full-home rewire is an expensive project reserved for major renovations, there are two cost-effective strategies. First, when renovating a room, ask your electrician to create more dedicated circuits to shorten the runs. Second, and more immediately, upgrade to high-quality LED bulbs. While all LEDs are efficient, better-quality bulbs have superior drivers that can better compensate for voltage fluctuations, ensuring consistent light output and maximum efficiency. According to data from Duke Energy, LED bulbs use up to 90% less energy and last 25 times longer than the incandescent bulbs 1980s homes were built for, providing an immediate and substantial ROI that also helps mitigate underlying wiring issues.
When to Replace Your AC Unit: The 15-Year Efficiency Drop-Off
An HVAC system is one of the most expensive components in a home, so replacing it is a major financial decision. For 1980s homes with their original or early-replacement units, the question of “when” to upgrade is critical for ROI. The answer is tied to a clear efficiency cliff. According to ENERGY STAR, HVAC systems that are over 10-15 years old are significantly less efficient than modern units. Upgrading can yield efficiency gains of 20-30%, resulting in substantial annual savings.
However, the biggest mistake is a “like-for-like” replacement. An oversized HVAC system—a common issue in older homes—will “short-cycle,” turning on and off frequently without ever running long enough to effectively dehumidify the air. This is inefficient and causes excessive wear and tear. The most cost-effective strategy is to first reduce your home’s heating and cooling load through the upgrades discussed earlier (insulation and air sealing). This “efficiency-first” approach often allows you to install a smaller, less expensive, and more efficient HVAC unit that is correctly sized for your now-improved home.
A properly sized unit will run for longer, more consistent cycles, providing better comfort, superior humidity control, and optimal energy performance. The savings come not just from the new unit’s higher efficiency rating, but from the synergistic effect of matching it to a high-performance building envelope.
Case Study: The Chicago Furnace Upgrade ROI
A Chicago home with a 1988-era 70,000 BTU furnace was a prime candidate for an upgrade. After completing comprehensive air sealing and insulation work, the home’s heating load was recalculated. The analysis showed a much smaller unit was now required. The owners upgraded to a modern, 95% efficient furnace that was properly sized for the reduced load. The result was an annual savings of $436.80 (at $0.80 per therm). This demonstrates the dual benefit of first reducing the load and then installing a correctly-sized, high-efficiency unit.
Key Takeaways
- The highest ROI upgrades address the building envelope first: attic insulation and air sealing offer payback periods of 2-3 years.
- A diagnostic blower door test is a low-cost, high-value investment that prevents wasteful spending on premature window replacement.
- Leveraging and stacking federal, state, and utility incentives is a critical financial strategy that can cover up to 30% of a project’s cost.
Solar Panels for Residential Roofs: Is Battery Storage Necessary for ROI?
Once you have maximized your home’s energy efficiency by reducing its consumption, the final step is to consider energy generation with rooftop solar panels. With a typical lifespan of 25 to 30 years, solar panels are a long-term investment in predictable energy costs. For a 1980s home that has been properly retrofitted, a smaller, less expensive solar system is required to cover its reduced energy needs, further improving the ROI of the entire project sequence.
The most pressing question for homeowners today is whether to include battery storage with their solar installation. Batteries add significant cost to a project, and their necessity for a positive ROI is entirely dependent on your local utility’s policies. The decision should not be emotional but purely mathematical. If you live in an area with a favorable net metering policy, where the utility credits you at the full retail rate for excess energy you send to the grid, a battery has a negative financial return. The grid itself is acting as your free, 100% efficient battery.
However, if your utility has shifted to “time-of-use” (TOU) rates or offers low credit for exported power, a battery can become profitable. It allows you to store cheap solar energy generated during the day and use it during peak evening hours when electricity is most expensive. The decision requires a clear-eyed analysis of your utility bills and rate structure. A decision framework can help clarify the choice.
A solar battery decision framework from Fine Homebuilding offers a clear, step-by-step process. The core logic involves checking your utility’s net metering policy first. If it’s a 1:1 credit, a battery is likely not cost-effective. If not, analyze your time-of-use rates; a battery becomes profitable if peak rates are more than double the off-peak rates. You must also calculate the “resilience value” to you—what is the cost of an 8-hour power outage to your home office or medical equipment? Finally, a smart move is to install a “battery-ready” inverter now, even if you delay the battery purchase, to save on future installation costs.
To put these principles into practice, the logical next step is to obtain objective, third-party data on your home’s specific performance. Engage a certified energy auditor to conduct a comprehensive assessment, including a blower door test, to build a customized and truly cost-effective retrofit plan.