Perfect dining ambiance isn’t about following rigid height and width rules; it’s about sculpting a ‘cone of intimacy’ with light that encourages connection and transforms the dining experience.
- The height of a pendant light dictates the psychological boundary of your dining space, directly impacting guest interaction.
- Bulb choice and shade material are more critical than the fixture’s style, as they control the quality of light and prevent uncomfortable glare.
Recommendation: Before finalizing any placement, use the ‘Seated Eye-Level Test’ to ensure the light enhances, rather than hinders, conversation and comfort for every guest at your table.
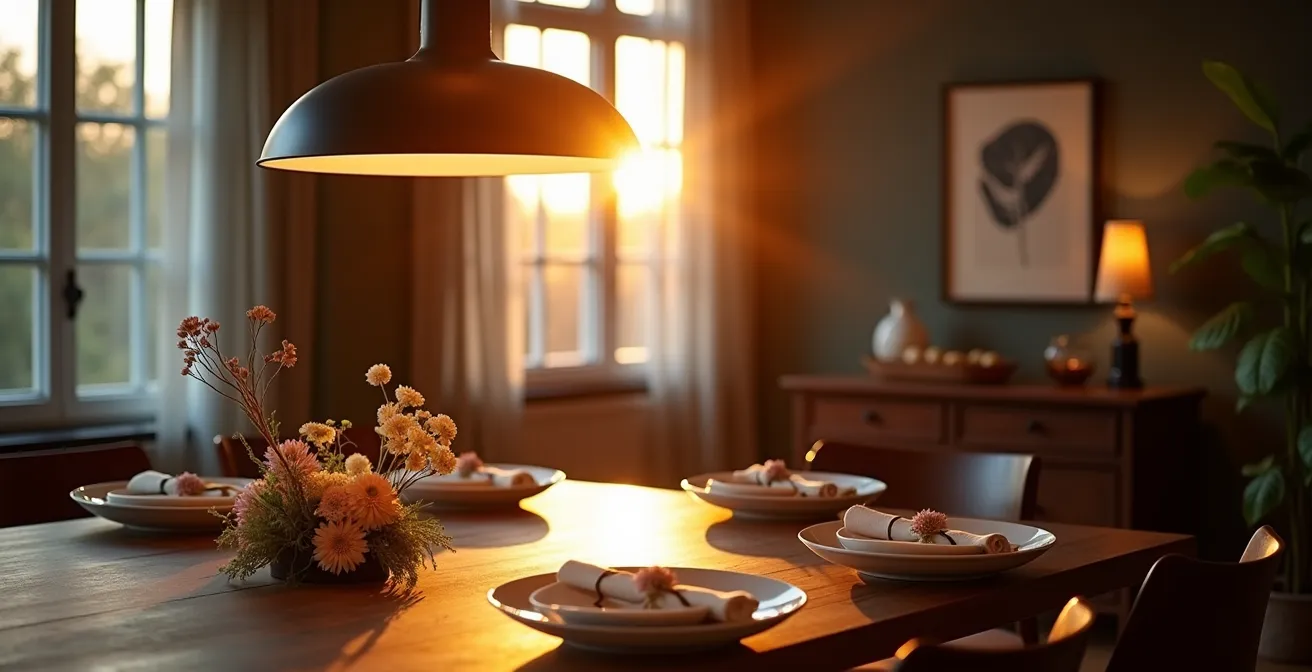
Every host dreams of recreating that magical, intimate atmosphere of a favorite restaurant at their own dining table. You’ve selected the menu, set the table, and curated the playlist. Yet, so often, the final element that truly defines the mood—the lighting—is treated as an afterthought, governed by a few generic rules found online. The common advice to simply hang a fixture 30-36 inches above the table misses the entire point. It’s like a chef following a recipe without understanding the chemistry of flavors. The result is functional, but it lacks soul.
The problem with a light hung too high or a bulb chosen too carelessly is that it flattens the experience. It illuminates the room but fails to define the space, leaving guests feeling exposed and disconnected. The secret to a truly captivating dining atmosphere lies not in measurements, but in manipulation—the artful manipulation of light and shadow to create focus, warmth, and a psychological bubble of intimacy. This isn’t just decoration; it’s social engineering through illumination.
This guide moves beyond the platitudes. We will explore the science behind the ambiance, focusing on how to create a “cone of intimacy” that becomes the invisible centerpiece of your dinner party. We will dissect how to select the right scale and layout, choose bulbs that prevent guest-glaring mistakes, and even integrate your lighting into a smart home system that adapts to your life. It’s time to stop just lighting a room and start designing an experience.
To guide you through this process, we’ll explore the key decisions that transform a simple light fixture into a powerful tool for creating atmosphere. From the foundational principles of height and scale to the nuanced details of bulb choice and smart home integration, this is your roadmap to mastering dining room lighting.
Summary: Mastering Pendant Light Placement for Unforgettable Dining
- Why Hanging Lights Too High Kills the Intimacy of a Dinner Party?
- How to Calculate the Ideal Pendant Diameter Based on Table Width?
- Single Statement vs Cluster: Which Layout Suits a Round Table?
- The Bulb Choice Mistake That Causes Glare for Your Guests
- When to Wire for Pendants: Critical Stages in a Ceiling Renovation
- How to Use Lighting Circuits to Visually Separate Dining and Living Zones?
- Circadian Rhythm Lighting: Can Automation Really Improve Sleep?
- Lighting Fixtures and Integration: How to Plan Circuits for a Smart Home Renovation?
Why Hanging Lights Too High Kills the Intimacy of a Dinner Party?
The most common mistake in dining room lighting isn’t style; it’s altitude. Hanging a pendant too high transforms it from an intimate mood-setter into a generic room light. The goal is to create a “cone of intimacy,” a pool of warm light that psychologically encloses the table and its occupants. When a light is too high, this cone becomes wide and diffuse, bleeding into the rest of the room and dissolving the focused, cozy atmosphere you want for conversation. The light should unite your guests, not just illuminate their food from a distance.
While lighting design guidelines often recommend hanging a pendant between 30 to 36 inches from the tabletop, this is merely a starting point. The true test is the human one. The bottom of the fixture should be low enough to feel connected to the table but high enough that it doesn’t obstruct the view of the person across from you. A lower light fosters a sense of closeness and encourages guests to lean in, speaking more softly and connecting more deeply. It creates a private world for the duration of the meal.
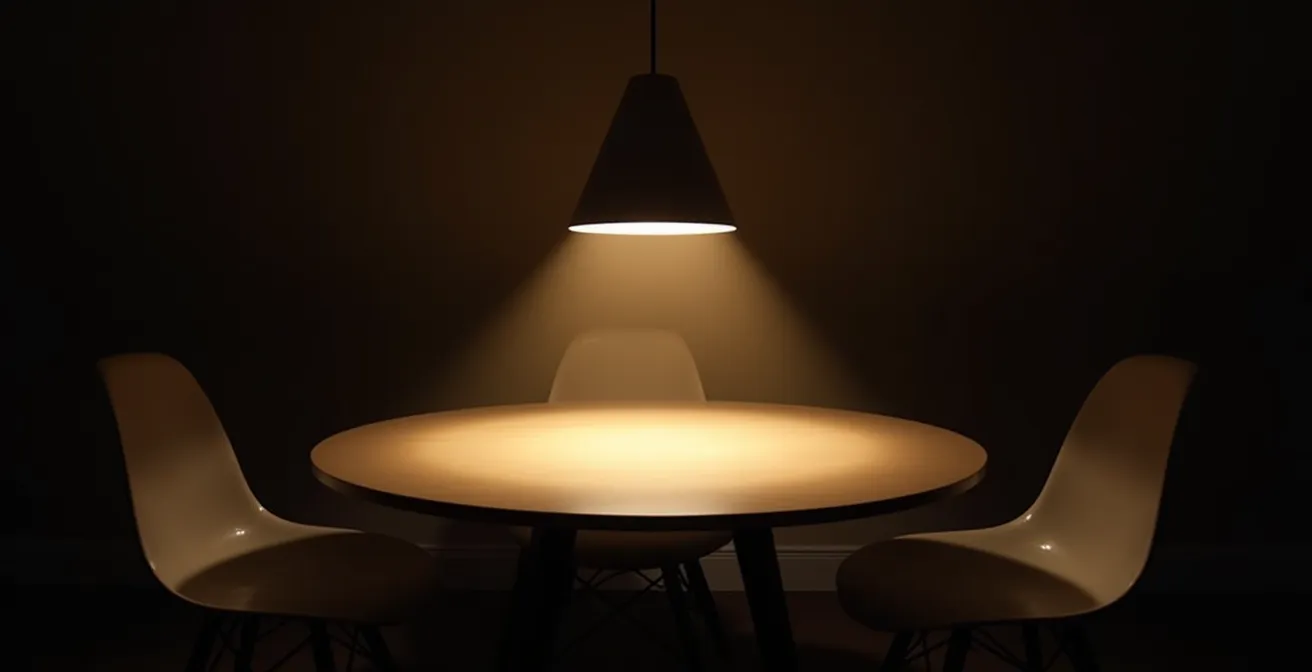
As this visualization shows, the tightly focused cone of light establishes a clear psychological boundary. To perfect this, conduct a simple sightline test. Have family members sit at the table and temporarily hang the fixture. Adjust the height until the bulb is hidden from a seated position and sightlines are clear. For ceilings taller than 8 feet, you can add 3 inches of height for every extra foot, but always prioritize the unobstructed view and the feeling of enclosure over rigid formulas.
How to Calculate the Ideal Pendant Diameter Based on Table Width?
Once you’ve established the vertical placement, the next dimension to consider is scale. A pendant light’s diameter has a profound impact on the table’s visual balance. A fixture that’s too small will look lost and insignificant, failing to anchor the space. Conversely, one that’s too large can feel oppressive and overwhelm the table. The general rule of thumb is to choose a fixture that is between one-half and two-thirds the width of your dining table. This ensures the light is substantial enough to make a statement without dominating the scene.
For example, a 48-inch wide table would ideally be paired with a pendant between 24 and 32 inches in diameter. This ratio creates a harmonious relationship between the table and the light, making them feel like a cohesive unit. The following table provides a quick reference based on standard table sizes.
| Table Width | Recommended Pendant Diameter | Visual Weight Consideration |
|---|---|---|
| 42 inches | 21-28 inches | Light fixtures: up to 31 inches |
| 48 inches | 24-32 inches | Light fixtures: up to 36 inches |
| 60 inches | 30-40 inches | Light fixtures: up to 45 inches |
However, an expert host knows that rules are sometimes meant to be broken for dramatic effect. As noted in The Ultimate Guide to Pendant Lighting, contemporary design often plays with these proportions. In a room with high ceilings (10 feet or more), selecting an oversized pendant that is slightly larger than the formula suggests can create a breathtaking focal point. In a minimalist space, a deliberately undersized fixture can emphasize negative space and create a sense of airy sophistication. The key is to make the choice intentional, not accidental.
Single Statement vs Cluster: Which Layout Suits a Round Table?
The shape of your dining table heavily influences the ideal lighting layout. For round and square tables, the choice is often straightforward. A single, large statement pendant centered over the table creates a natural focal point that mirrors the table’s geometry. It’s a classic, balanced approach that reinforces the communal nature of a round table. As the Schoolhouse Design Team points out, the goal is a harmonious relationship between the fixture and the table. They advise in their guide, “How To Choose the Right Size Dining Room Chandelier or Pendant”:
For round tables, the fixture should be about ½ to ¾ the diameter of the table
– Schoolhouse Design Team, How To Choose the Right Size Dining Room Chandelier or Pendant
For long, rectangular tables, a single fixture can feel inadequate, leaving the ends of the table in shadow. Here, a linear suspension light or a cluster of multiple smaller pendants is far more effective. A linear fixture provides even illumination along the length of the table, while a cluster of two or three pendants adds visual interest and rhythm. When hanging multiple fixtures, spacing is crucial to avoid a cluttered look. Aim for a minimum distance of 24 to 36 inches between each pendant. This provides enough separation for each light to feel distinct while still reading as a cohesive group.
A cluster can also be a creative solution for a round table, especially if you opt for a trio of smaller pendants hung at slightly different heights. This creates a dynamic, sculptural effect that can feel more modern and playful than a single, monolithic fixture.
The Bulb Choice Mistake That Causes Glare for Your Guests
You can have the most beautiful fixture perfectly positioned, but if the bulb inside is wrong, the entire experience is ruined. The single most disruptive element at a dinner party is glare. A bare filament or an overly bright bulb shining directly into a guest’s eyes is the atmospheric equivalent of shouting. It’s uncomfortable, distracting, and forces people to squint or turn away—the exact opposite of the connection you want to foster. The most important factor is ensuring the light source itself is shielded from a seated guest’s line of sight.
The material of your pendant’s shade plays a critical role in managing glare. Opaque shades, like those made of metal or thick ceramic, are excellent for this. They direct all light downwards, creating a dramatic, focused pool of light perfect for task-oriented intimacy. Translucent materials like frosted glass, fabric, or paper diffuse the light, casting a softer, more ambient glow. With these, the key is to use a frosted or globe-style bulb (like a G25) to prevent hot spots. Clear glass shades are the most challenging; they require a vintage-style filament bulb with a very low lumen output or a mirrored-top bulb to direct light upwards into the fixture rather than into your guests’ eyes.
Never assume a light will work without testing it from every seat. Use this simple audit to guarantee a comfortable experience for everyone.
Your Action Plan: Seated Eye-Level Test for Glare Prevention
- Position pendant 70-90 cm from the table top to the bottom of the shade.
- Sit in each dining chair around the table, adopting a natural posture.
- Verify that the bulb itself (the filament or bright source) is completely hidden by the shade from your seated eye level.
- Check for both direct glare (seeing the bright filament) and bloom glare (an uncomfortably bright aura around the shade).
- For homes with children of varying heights, consider a slightly lower placement to prevent them from looking directly up into the bare bulb.
When to Wire for Pendants: Critical Stages in a Ceiling Renovation
For those undergoing a renovation or new build, the most critical lighting decision happens long before paint colors are chosen: the placement of the ceiling junction box. Moving an electrical box after the drywall is installed is a messy and expensive job. In fact, according to home renovation data, the cost of moving a junction box after drywall costs 3x to 5x higher than planning it correctly from the start. This makes the rough-in stage of construction the absolute best time to wire for your dining pendant.
During this phase, you must decide exactly where your dining table will live. The goal is to have the junction box perfectly centered over the future table. If you’re unsure of the exact table placement, a smart move is to install wood blocking between the ceiling joists in the general dining area during framing. This provides a solid anchor point, giving you more flexibility later to install a hook and swag the light into the perfect position with a decorative chain if the junction box is slightly off-center.
This “future-proofing” approach saves immense headaches down the line. It’s far easier to adjust a chain than to call an electrician to cut into a finished ceiling. The ideal timeline involves confirming your furniture layout before the drywall goes up. Walk the space, use painter’s tape on the floor to mark the table’s footprint, and ensure your lighting plan aligns with how you will actually live in the room. Planning is the difference between a seamless installation and a costly compromise.
How to Use Lighting Circuits to Visually Separate Dining and Living Zones?
In modern open-plan homes, creating a sense of separation between the dining and living areas without building walls is a common challenge. The solution is light layering. By placing your dining pendant on a separate circuit and dimmer from the main living area lights, you can create “invisible walls” with light. This technique relies on the power of contrast to define distinct functional zones.
The principle is simple: our eyes are drawn to the brightest areas. During a dinner party, you can dim the surrounding living room lights to around 20% brightness while keeping your dining pendant at a comfortable 70%. This contrast immediately establishes the dining table as the focal point and creates a psychological boundary. The dining area feels cozy and contained, while the living area recedes into a calm, ambient backdrop. This is far more sophisticated than having the entire open-plan space lit to a single, uniform brightness.
To avoid the “black hole effect,” where a brightly lit dining table feels isolated in a dark room, you can introduce a third layer of accent lighting in the living zone. This might include picture lights, shelf lighting, or a table lamp, set to a low level (around 30%). This provides just enough ambient light to make the adjacent space feel welcoming without competing for attention. Smart lighting systems make this effortless, allowing you to program “scenes” for different activities.
| Scene Name | Dining Zone | Living Zone | Accent Layers |
|---|---|---|---|
| Dinner Party | 70% warm (2700K) | 20% warm | 30% picture lights |
| Weeknight Meal | 100% neutral (3000K) | 50% warm | Off |
| Homework Time | 100% cool (4000K) | 70% neutral | 50% task lights |
| Movie Night | Off | 10% warm | 5% pathway lights |
Circadian Rhythm Lighting: Can Automation Really Improve Sleep?
The most advanced level of lighting design goes beyond aesthetics and mood, venturing into the realm of wellness. The light we are exposed to in the evening has a direct impact on our body’s production of melatonin, the hormone that regulates sleep. Bright, blue-toned light (similar to midday sun) suppresses melatonin, while warm, dim light allows it to be produced naturally. This is the core of circadian rhythm lighting: aligning your home’s artificial light with the natural cycle of the sun to improve sleep and overall well-being.
Your dining room is often the last brightly lit space you occupy before winding down for the night. Automating the lighting here can serve as a powerful “sundown signal” to your body. Smart lighting systems can be programmed to automatically adjust both the brightness and the visual temperature (measured in Kelvin) of the light throughout the evening. For example, a “Sundown Supper” scene might start with a functional, neutral light of 3000K at 100% brightness during the meal.
As the evening progresses, the system can automatically transition the light to be much warmer and dimmer. Implementations like the Adaptive Lighting integration for Home Assistant demonstrate this by shifting the light towards a candle-like 2200K and reducing brightness to 40% over the course of two hours post-dinner. This gradual change mimics a natural sunset, gently preparing your body for rest. Users of such systems report tangible improvements in sleep quality, showcasing that your dining light can be a tool for both ambiance and health.
Key Takeaways
- The primary goal of a dining pendant is to create a ‘cone of intimacy,’ a psychological boundary that fosters connection.
- Rules for height (30-36″) and diameter (1/2-2/3 of table width) are starting points, not final laws. Always test with a human eye.
- Preventing glare by shielding the bulb from seated sightlines is more important for guest comfort than any other factor.
Lighting Fixtures and Integration: How to Plan Circuits for a Smart Home Renovation?
Implementing advanced concepts like light layering and circadian automation requires a smart home foundation. During a renovation, the core decision is whether to use smart bulbs or smart switches. They are not interchangeable, and using both on the same circuit often leads to conflicts and flickering. As lighting expert Tyler Cipriani states in a Hackaday guide to circadian lighting, you must “Force a choice: either make the switch smart OR make the bulbs smart, not both.”
Smart bulbs offer full color and temperature control, making them ideal for achieving precise circadian shifts. However, they can be cumbersome for circuits with many fixtures, and they become useless if someone accidentally turns off the physical wall switch. Smart switches, on the other hand, control the entire circuit from the wall. They are excellent for dimming and for circuits with multiple pendants, but most standard smart switches cannot change the color temperature of the bulbs they control. Your choice depends on your primary goal.
This decision matrix can help guide you, especially during a renovation where wiring can be planned.
| Factor | Smart Bulbs | Smart Switches | Recommendation |
|---|---|---|---|
| Color Control | Full RGB + White | Dimming only | Bulbs for color needs |
| Neutral Wire | Not required | Required | Switches need neutral |
| Multiple Fixtures | Individual control | All on circuit | Switches for groups |
| Power Load | Per bulb limit | Total circuit limit | Calculate total watts |
During a renovation, the most future-proof decision is to run a neutral wire to every switch box. This is now standard practice but was not always the case, and it is a requirement for most smart switches. This single step keeps your options open for any future smart home technology you wish to install, ensuring your home’s lighting infrastructure is as intelligent as the fixtures you choose.
Now that you are armed with the principles of atmospheric lighting, from sculpting intimacy to signaling your body for rest, you can approach your dining space not as a decorator, but as a true lighting specialist. Transform your next meal into a memorable event by applying these strategies to create an unforgettable ambiance for your guests.